Showing posts with label ui. Show all posts

Friday, January 09, 2009

How to control the sort of languages in the selector


A great article was just published by Igor regarding the way to control the language sorting. By default, the languages that show up in that list are not sorted by name, but by the date they were created.
In the multilingual solutions with more than 10 languages this may cause some confusion from the editors perspective that have access to multiple languages. If there are not security settings specified on the language level, this may be a bit of an inconvenience.
Using this solution, you can control the language sort order by either name as it is shown in the example or by other parameters, such as number of versions of example.

Kudos goes to Igor for the solution!

Thursday, December 04, 2008

How to bring a webform to Sitecore desktop


Applies to both Sitecore 5 and Sitecore 6.

If you need to bring a custom built web form (aspx) to Sitecore's desktop, it is pretty easy to do.

First, you need a webform residing under the root of your web site, for example, /forms/testform.aspx.

Then you need to create a reference to this webform from the core database under /sitecore/content/Applications:
app_definition
Just fill out the necessary "Application" field with the relative path to your .aspx (/forms/testform.aspx). Here you can also specify additional parameters such as icon, size of the app, tooltip, etc.
This is the definition of your application.

After this, add a shortcut to the app from either "Bottom", "Left", "Right" or "Programs" menus under /sitecore/content/Documents and settings/All users/Start menu.
In the "Application" field, just put the path to the item containing the definition of your app created previously:
app_reference

That's it! Now you can launch your app within Sitecore Desktop:
 start_menu

result_custom_app

Now if you want to access Sitecore context objects (Items, Database, Fields, etc.) it is recommended to create a custom site for that purpose and associate it with the folder hosting your custom forms:

<sites>
   <site name="shell" virtualFolder="/sitecore/shell" physicalFolder="/sitecore/shell" rootPath="/sitecore/content" startItem="/home" language="en" database="core" domain="sitecore" loginPage="/sitecore/login" content="master" contentStartItem="/Home" enableWorkflow="true" xmlControlPage="/sitecore/shell/default.aspx" browserTitle="Sitecore" htmlCacheSize="2MB" registryCacheSize="3MB" viewStateCacheSize="200KB" xslCacheSize="5MB" />
   ...
   <site name="custom_forms" virtualFolder="/forms" physicalFolder="/forms" rootPath="/sitecore/content" startItem="/home" language="en" database="core" domain="sitecore" content="master" enableWorkflow="true" />
 
   <site name="website" virtualFolder="/" physicalFolder="/" rootPath="/sitecore/content" startItem="/home" database="web" domain="extranet" allowDebug="true" cacheHtml="true" htmlCacheSize="10MB" registryCacheSize="0" viewStateCacheSize="0" xslCacheSize="5MB" filteredItemsCacheSize="2MB" enablePreview="true" enableWebEdit="true" enableDebugger="true" disableClientData="false" />
   ...
 </sites>

After that you can have code like this work: Sitecore.Context.Site.Name

Enjoy!

Wednesday, March 26, 2008

Enhanced Lookup Field (continued)


This is an enhancement or continuation of my old post where I was showing how easily you can teach the lookup field to show field values of the source items instead of just name.

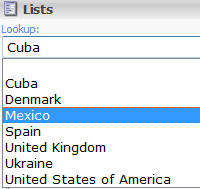
This may be pretty handy in the scenarios with more than one content languages in Sitecore. Let's imagine that we would like to have a lookup field that is used as a "country selector" pulling out those items from the "global" repository:

lookup1

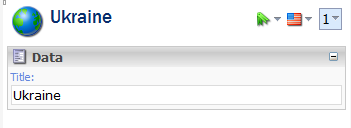
Then let's imagine that we have 2 more content languages besides English in the system (Spanish and Ukrainian) and that our "Country" template that our source items are created from has only one field defined that is not shared across languages and versions called "Title":
lookup2

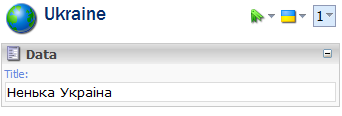
This value is going to be translated into all the languages:
image

lookup3

In other words, the "Title" field will have different values depending on the selected language.

Now it should make a lot of sense to "teach" our lookup field to retrieve those language specific values and show them in the drop down list instead of item names.

In order to do that, we will have to customize the lookup field by inheriting from the default one. The code of the custom lookup field is shown below:

   1: using System;
   2: using System.Collections;
   3: using System.Web.UI;
   4:  
   5: using Sitecore;
   6: using Sitecore.Data.Items;
   7: using Sitecore.Diagnostics;
   8: using Sitecore.Globalization;
   9: using Sitecore.Resources;
  10: using Sitecore.Shell.Applications.ContentEditor;
  11: using Sitecore.Text;
  12:  
  13: namespace SCUSAINC.Shell.Applications.ContentEditor
  14: {
  15:     public class CustomLookup : LookupEx
  16:     {
  17:         // the name of the field that we have defined for the "Template field" template
  18:         private const string sourceFieldName = "SourceFieldName";
  19:         protected string itemlanguage;
  20:  
  21:         protected override void OnLoad(EventArgs args)
  22:         {
  23:             if (!Sitecore.Context.ClientPage.IsEvent)
  24:             {
  25:                 Item contextItem = Sitecore.Context.ContentDatabase.Items[this.ItemID];
  26:  
  27:                 foreach (TemplateFieldItem tfItem in contextItem.Template.OwnFields)
  28:                 {
  29:                     // do the necessary checks
  30:                     if (tfItem.Source == this.Source &&
  31:                         tfItem.InnerItem != null &&
  32:                         tfItem.InnerItem.Fields[sourceFieldName] != null &&
  33:                         tfItem.InnerItem.Fields[sourceFieldName].Value != string.Empty)
  34:                     {
  35:                         // setting the FieldName property that will store the field name of the data source item
  36:                         // that we will consume in the "GetItemHeader" method
  37:                         FieldName = tfItem.InnerItem.Fields[sourceFieldName].Value;
  38:                         break;
  39:                     }
  40:                 }
  41:             }
  42:             base.OnLoad(args);
  43:         }
  44:  
  45:         protected override string GetItemHeader(Item item)
  46:         {
  47:             Assert.ArgumentNotNull(item, "item");
  48:             if (this.FieldName.StartsWith("@"))
  49:             {
  50:                 return item[this.FieldName.Substring(1)];
  51:             }
  52:             if (this.FieldName.Length > 0)
  53:             {
  54:                 if (ItemLanguage != null)
  55:                 {
  56:                     // return the language specific value of the source item's field
  57:                     return Sitecore.Context.ContentDatabase.GetItem(item.ID, Language.Parse(ItemLanguage))[this.FieldName];
  58:                 }
  59:             }
  60:             return item.DisplayName;
  61:         }
  62:  
  63:         // this method is used to retrieve the currently selected content language
  64:         // note that there is no code that sets this value, it is being set from outside by Content Editor
  65:         public string ItemLanguage
  66:         {
  67:             set { this.itemlanguage = value; }
  68:             get { return this.itemlanguage; }
  69:         }
  70:     }
  71: }

This should be compiled and the binary should be copied over to the bin directory. Then you should do two configuration steps and create the field reference in Sitecore:
1. Define the namespace of the control in the <controlSources> section:
<source mode="on" namespace="SCUSAINC.Shell.Applications.ContentEditor" assembly="CustomFields" prefix="custom" />
- the "namespace" attribute  is equaled to the one defined in your class.
- the "assembly" attribute  is obviously the name of the DLL that you compile.
- the "prefix" is something that you define but it will be used in the "field type" item creation step #3 below.

2. Open up "/App_Config/FieldTypes.config" and add the reference to your custom field:
<fieldType name="custom lookup" type="Sitecore.Data.Fields.LookupField,Sitecore.Kernel" />
- the "name" attribute will be the same as the "field type" item name in the last step below.
- the "type" attribute should be the same as above.

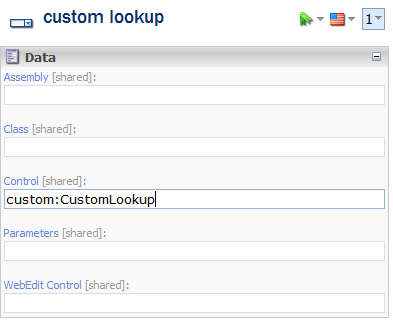
3. Create an "field type" item under "/sitecore/system/Field types". The easiest way to do that is to duplicate the existing "lookup" item and change the "Control" field.
Note that you should name the item as the value of the "name" attribute set on the second step.lookup4
This field will contain the value of the prefix attribute set on the first step and the name of the class that you have previously compiled followed by the colon.

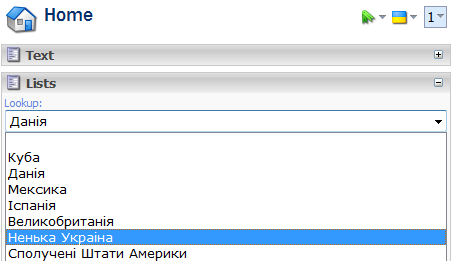
Well, enough boring stuff. Here is the result in Spanish:
lookup5

and in Ukrainian:
lookup6

Hope you find it useful.

Tuesday, July 17, 2007

Editing media files through the UI


You may need to let your business users edit the physical files that your media items point to. Since reuploading a file will cause creation of another media item and you will have to reconnect the content item with media item, this could be too complex for business users.

This then the following approach can be used.

First of all, a special button should be added to the media tab. In order to do this, go to the core database -> and create a button under /sitecore/system/Ribbons/Contextual Ribbons/Media/Media/Media. The easiest way will be to duplicate the existing Download button and change the name to something more appropriate, e.g. "Edit File". Set the following properties:

  • Header = Edit File
  • Icon = Applications/16x16/contract.png
  • Click = media:edit
  • Tooltip = Edit the file.

The Click field is the most important. This value will connect the button with the execution logic.

Next step will be to define the "media:edit" command. Open the \app_config\Commands.config file and add something like:

<command name="media:edit" type="WebApp.Shell.Framework.Commands.Media.Edit,WebApp" />

This will tell Sitecore to look up the "WebApp.Shell.Framework.Commands.Media.Edit" class in the WebApp assembly from the bin folder.

So the only thing that is left to do is to compile the code that will execute an application to edit the file.

The code is represented below:

using Sitecore; using Sitecore.Data; using Sitecore.Data.Items; using Sitecore.Shell.Framework; using Sitecore.IO; using Sitecore.Text; using Sitecore.Shell.Framework.Commands;

namespace WebApp.Shell.Framework.Commands.Media { public class Edit : Command { public override void Execute(CommandContext context) { foreach (Item item in context.Items) { string filename = item["file path"]; if (FileUtil.FileExists(filename)) { UrlString url = new UrlString(); url.Append("fi", filename); if (filename.EndsWith(".xml", StringComparison.OrdinalIgnoreCase)) { Windows.RunApplication("Layouts/IDE", url.ToString()); return; } } } } } }

This is basically a class that inherits from the Command base class and contains one single method "Execute" that is fired whenever the button is clicked.

In the logic of this method we simply get the currently selected media item, get the physical path and check if this is an XML file. If it is, we execute the Developer Center application that allows us to edit and save the file. You can modify the logic to fit your needs.

This is how it looks like:

Note that this scenario deals with file system media storage. In case of database storage you will be able to download the media file from the blob field and reattach it to the same media item.

Wednesday, June 13, 2007

Insert Sitecore Link dialog - another icon


This could be irritating for some editors as the icons for the Sitecore Internal Link dialog and Hyperlink Manager are the same.

You can change it by changing the Icon field of the "Insert Sitecore Link" item: /sitecore/system/Settings/Html Editor Profiles/<name of the profile that you use>/Toolbar 1/Insert Sitecore Link

Here is the image you can use as a source.

Copy this image to \sitecore\shell\RadControls\Editor\Skins\Monochrome\Buttons\

Here is the result: Look much better now and less confusing for the editors. Please don’t forget to copy the file when upgrading in future.

Tuesday, January 02, 2007

Cannot see the template folder?


This is applied to Sitecore 5.3 061102. If you create a folder (template container) for your custom templates in the Template Manager, you might not see this folder in the dialog when adding an item from a template or changing the template. The solution is to edit the \sitecore\shell\Controls\Data\TemplateDataContext.xml file to include the GUID of the template "Template Folder" that is placed under /sitecore/templates/system/templates/. The Filter attribute of the DataContext definition should be edited:
before: Filter="Contains('{E3E2D58C-DF95-4230-ADC9-279924CECE84}, {...}, {...}', @@templateid)"
after: Filter="Contains('{0437FEE2-44C9-46A6-ABE9-28858D9FEE8C},{...}, {...}', @@templateid)"
where {0437FEE2-44C9-46A6-ABE9-28858D9FEE8C} is the GUID of the "Template Folder" template.

Friday, August 18, 2006

5.3: Enabling Edit chunk in Content Editor


You may not see the Edit chunk/button while being logged in as a newly created user. Complete these steps to make it visible: 1. Switch to the core database; 2. Open the Security Editor; 3. Locate this item /sitecore/system/ribbons/chunks/workflow edit/edit; 4. Toggle the inherit checkbox as shown below:

Speeding up File Explorer


On installations with a huge amount of media in the upload folder, you may experience serious delay when opening the File Explorer. If you feel that the upload folder’s existence doesn’t make much sense in File Explorer, you can make this folder invisible; this should speed up the performance. Here are the steps: 1. Locate the File Explorer’s form under \sitecore\shell\Applications\Files\File explorer\ and copy it to \sitecore\shell\Override. 2. In the newly copied file make the following changes: <DataContext ID="FileExplorerDataContext" DataContext="FilteredFileExplorerDataContext" DefaultItem="/" ShowRoot="true" Filter="Not(@@name='upload')"/> <DataContext ID="FilteredFileExplorerDataContext" DataContext="FileExplorerDataContext" DefaultItem="/" Filter="Not(@@name='upload')"/> As can be seen, I assigned a special folder name filter for the DataContext objects. Now the contents of the upload folder should not be loaded to File Explorer.

Sitecore taskbar at the top?


For some inexplicable reason I thought that it is not possible :-) My doubts were destroyed by Jacob. Just move the <startbar> tag above the <border> tag in the /sitecore/shell/Applications/shell.xml file <GridPanel Class="scFill scFixed"> <Startbar GridPanel.Class="scStartbar"/> <Border ID="Desktop" GridPanel.Class="scFill" ContextMenu="ShowContextMenu"> <Border ID="Links" DblClick="Launch"/> </Border> </GridPanel> Result: It turned out that nothing is impossible in Sitecore.

Wednesday, July 05, 2006

HTML Editor's context menu items


In order to disable some items in the Context Menu of the HTML Editor, you should modify the file \sitecore\shell\Editor\Configuration\AutoConfigure\Full.config Please have a look at the contextmenu section. <contextmenu> <item name="Editing" value="False" /> <item name="Format" value="True" /> <item name="Insert" value="True" /> … If you want to disable an item, you should set appropriate value to False.

Thursday, June 29, 2006

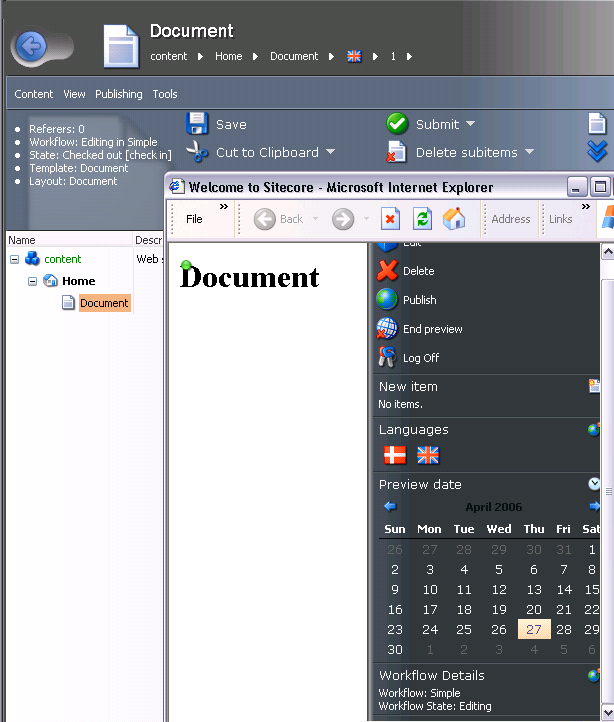
Extending the Preview flyout panel


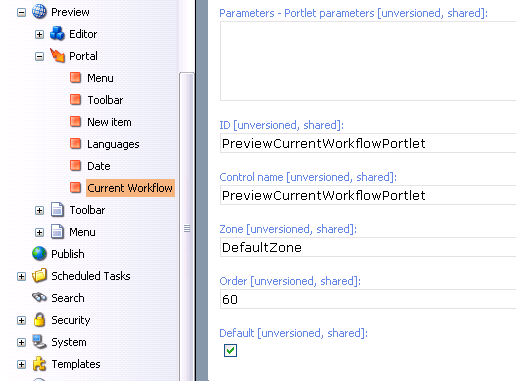
The steps below show how to extend the preview flyout panel by adding a space to display the current workflow state of the context item. 1. Locate the Portal item under content/Applications/Preview item in the core database. 2. Add an item from the Portlet template:
3. Fill the necessary fields such as it is shown above.
4. Create a folder under sitecore\shell\Applications\Preview\Portlets\ 5. Create an XML file with the following source code:

<?xml version="1.0" encoding="utf-8" ?>

<control xmlns:def="Definition" xmlns="http://schemas.sitecore.net/Visual-Studio-Intellisense">

<PreviewCurrentWorkflowPortlet

def:inherits="Custom.Portlets.PreviewCurrentWorkflowPortletXmlControl,CurrentWorkflowPortlet">

<Border def:ID="Portlet">

<DefaultPortletWindow def:ID="Window" Header="Workflow Details" Icon="Network/16x16/inbox.png">

<Border def:ID="Body"/>

<Literal def:ID="Workflow" Text="Workflow: " />

<br />

<Literal def:ID="WorkflowState" Text="Workflow State" />

</DefaultPortletWindow>

</Border>

</PreviewCurrentWorkflowPortlet>

</control>

6. Create a class that will stand for this XML control. Compile it and place into the bin folder. using System; using Sitecore; using Sitecore.Data.Items; using Sitecore.Web.UI.XmlControls; using Sitecore.Web.UI.HtmlControls; namespace Custom.Portlets { public class PreviewCurrentWorkflowPortletXmlControl : XmlControl { protected Border Body; protected Border Portlet; protected XmlControl Window; protected Literal WorkflowState; protected Literal Workflow; protected override void OnLoad(EventArgs e) { base.OnLoad(e); if (!Sitecore.Context.ClientPage.IsEvent) { this.Window.ID = this.ID + "_window"; this.Portlet.Attributes["id"] = this.ID; Item item = UIUtil.GetItemFromQueryString(Sitecore.Context.ContentDatabase); string workflowID = item.Fields["__Workflow"].Value; string stateName = "none"; string workflowName = "none"; if(workflowID != "") { stateName = GetState(item, Sitecore.Context.Database, workflowID).DisplayName; workflowName = Sitecore.Context.Database.Items[new Sitecore.Data.ID(workflowID)].Name; } this.WorkflowState.Text += stateName; this.Workflow.Text += workflowName; } } private Sitecore.Workflows.WorkflowState GetState(Sitecore.Data.Items.Item item, Sitecore.Data.Database database, string workflowID) { // getting the workflow provider for the master database Sitecore.Workflows.IWorkflowProvider provider = database.WorkflowProvider; // getting the Simple workflow through the IWorkflow interface Sitecore.Workflows.IWorkflow iWorkflow = provider.GetWorkflow(workflowID); return iWorkflow.GetState(item); } } } 7. Add the reference to this dll into the web.config (UI » References section): /bin/CurrentWorkflowPortlet.dll The result of these actions is depicted below:

Exporting the broken link report


This is some instructions on how to add an Export button to the Broken Links application. Upon clicking, you can export the results of the broken link search to any location, e.g. Excel worksheet, XML file, etc. The sample code below outputs the results to the log file. 1. Add a command under /content/applications/tools/broken links/commands: 2. Fill the fields as it is shown above. 3. Find the XML control that stands for the Broken Link dialog. It can be found here: \sitecore\shell\Applications\Tools\Broken links\Broken links.xml 4. Substitute the code beside definition with your custom class as it is shown below: <CodeBeside Type="Custom.CustomBrokenLinksForm,BrokenLinksForm"/> where Custom.CustomBrokenLinksForm is the full class name with namespace, BrokenLinksForm is the name of the assembly. 5. Create and compile the following sample code into the bin directory. This class outputs the broken link results into the log file. You can implement your own logic here to export it to any file. using System; using Sitecore; using Sitecore.Jobs; using Sitecore.Links; using Sitecore.Web.UI.Sheer; using Sitecore.Resources; using Sitecore.Diagnostics; namespace Custom { public class CustomBrokenLinksForm : Sitecore.Shell.Applications.Tools.BrokenLinks.BrokenLinksForm { [HandleMessage("brokenlinks:export")] protected void Export(Message message) { Context.ClientPage.ClientResponse.Timer("StartExport", 10); } public void StartExport() { Context.ClientPage.ServerProperties["handle"] = LinkDatabaseProxy.GetBrokenLinks(Context.ContentDatabase).ToString(); CheckExportStatus(); } protected void CheckExportStatus() { Handle handle = Handle.Parse(Context.ClientPage.ServerProperties["handle"] as string); JobStatus status = LinkDatabaseProxy.GetStatus(handle); if (status.Failed) { Sitecore.Context.ClientPage.ClientResponse.ShowError("An error occured.", StringUtil.StringCollectionToString(status.Messages)); } else if (status.State == JobState.Finished) { ExportReport(status); } else { Context.ClientPage.ClientResponse.SetInnerHtml("Report", "
" + Images.GetImage("Applications/48x48/exchange.png", 0x30, 0x30) + " Processed: " + status.Processed.ToString() + "
"); Context.ClientPage.ClientResponse.Timer("CheckExportStatus", 500); } } protected void ExportReport(JobStatus status) { ItemLink[] linkArray = status.Result as ItemLink[]; Log.Info("Exporting the broken link results into Excel worksheet...", this); if(linkArray.Length == 0) { Log.Info("There were no broken links found. ", this); } else { foreach(ItemLink itemLink in linkArray) { Log.Info(String.Format("Broken link found. SourceDatabaseName: {0}, SourceFieldID: {1}, SourceItemID: {2}, TargetDatabaseName: {3}, TargetItemID: {4}, TargetPath: {5}.", itemLink.SourceDatabaseName, itemLink.SourceFieldID, itemLink.SourceItemID, itemLink.TargetDatabaseName, itemLink.TargetItemID, itemLink.TargetPath), this); } } Context.ClientPage.ClientResponse.SetInnerHtml("Report", "The export process is finished."); } } }

Adding the Save As button to Image Editor


You can customize Image Editor and add "Save As" button. Here are steps: 1) Copy Image Editor XAML application from "\sitecore\shell\Applications\Media\Imager\Imager.xml" to "\sitecore\shell\Override\" folder. 2) Change CodeBeside e.g.: <CodeBeside Type="CustomImagerForm.CustomImagerForm, CustomImagerForm"/> 3) Create a custom code beside class that inherits from Sitecore.Shell.Applications.Media.Imager.ImagerForm 4) Here is the example code: using System; using System.IO; using Sitecore; using Sitecore.Text; using Sitecore.Data; using Sitecore.Data.Items; using Sitecore.Shell; using Sitecore.Shell.Applications.Media.Imager; using Sitecore.Web.UI.Sheer; namespace CustomImagerForm { public class CustomImagerForm: ImagerForm { [HandleMessage("imager:saveas", true)] protected void SaveAs(ClientPipelineArgs args) { if (args.IsPostBack) { if (((args.Result == null) || (args.Result.Length <= 0)) || (args.Result == "undefined")) { return; } string lastFile = this.GetWorkFile(this.Work); SaveAsNewImage(lastFile, args.Result); } else { Context.ClientPage.ClientResponse.Input("Please input new name without extension? ", "NewName"); args.WaitForPostBack(); } } #region Private Method private void SaveAsNewImage(string oldName, string newImage) { oldName = MainUtil.MapPath(oldName); newImage = String.Concat(Path.GetDirectoryName(MainUtil.MapPath(this.File)), @"\" , newImage , Path.GetExtension(oldName)); System.IO.File.Copy(oldName, newImage, true); } private string GetWorkFile(int index) { ListString listFiles = new ListString(this.UndoList, '|'); string lastFile = listFiles[index]; return lastFile.Substring(0, lastFile.IndexOf("*")); } #endregion Private Method } } I’ve attached this class. 5) Go to Sitecore client and switch to Core database 6) Duplicate node /content/Applications/Media/Imager/Toolbar/Resize to /content/Applications/Media/Imager/Toolbar/SaveAs and place a message “imager:saveas” to the Click field. In the Icon filed you can place your the appropriate icon. So, when you click SaveAs, the new file name without extension will be requested and aftewards Image Editor saves edited image to new one.

Creating Debug Item button


You may consider adding a button to the Content Editor’s toolbar and context menu that will start the debugging of the selected item. Here are the steps: 1. Create a new command named Debug under /Content/System/Commands in the core database. 2. Fill all necessary fields in the newly created command. Pay attention to the following ones: • Click – you can set some arbitrary value here, for example item:debug. • Type – specify namespace.class_name,assembly_name here of the class which is shown below: using System; using Sitecore; using Sitecore.Data.Items; namespace Sitecore.Shell.Commands { public class DebugItem : CommandBase { public override bool Execute(Item[] itemArray) { Context.ClientPage.ClientResponse.Eval("window.open('/?sc_itemid=" + itemArray[0].ID.ToString() + "&sc_debug=1', '_blank')"); return true; } public override CommandStatus QueryStatus(Item[] itemArray2) { return CommandStatus.Normal; } } } As can be seen, we inherited this class from the CommandBase class. The key method is named Execute where we are opening the selected item in debug mode in new window. The QueryStatus method is obligatory to be overridden. 3. Navigate to System/Shell/__Default/Commands and Add “Debug” to the Commands multilist field That’s all, the command should be present in the context menu. After clicking, you should get the selected item in the debug mode. Note that the selected item should be present in the web database, otherwise, the home node will be shown upon clicking on the Debug command.