Friday, December 14, 2007

Power of Sitecore: Separation of UI and Data Layers


There is a simple approach on how you can accomplish user driven site design by letting them select different CSS files or skins.

What I did is put an XSLT rendering into the head section of the layout that will be reused across the pages:

<head>

<title>Some title</title>

<sc:XslFile ID="styleSelector" Path="/xsl/styleselector.xslt" runat="server" />

</head>

The source of the xslt rendering is looking for the “css” field of the “home” item which is a lookup pointing to the media library:

<!-- getting the id of the selected css asset -->

<xsl:variable name="cssAssetID" select="sc:fld('css',$home)"/>

<!-- getting the actual path of the css asset -->

<xsl:variable name="cssAssetPath" select="sc:fld('path',sc:item($cssAssetID,.))"/>

<!-- building the CSS link tag -->

<link href="{$cssAssetPath}" rel="stylesheet" type="text/css" />

The logic eventually outputs the link tag with the CSS file reference.

The “css” field is just a lookup field pointing to the media library repository with already uploaded CSS files and looks like:

css_field

The result of different selections is shown below.

For the “Basic Blue” selection:

blue_layout

For the “Basic Red” selection:

red_layout

WebEdit content markers


This is pretty simple, but still worth mentioning.

In order to add the green content markers to your page in XSLT, use this approach.

As for .NET, you have a number of options:

This will create the content marker that points to the context item: <sc:ContentDot id="contentDot" runat="server" />

This will create the content marker that points to the “news” item: <sc:ContentDot id="contentDot" DataSource="/sitecore/content/home/news" runat="server" />

This will create the content marker that points to the item with the specified ID: <sc:ContentDot id="contentDot" DataSource="{687BF9D7-9968-4EDF-863E-0A2611DDD51B}" runat="server" />

If you are constructing the controls dynamically, here is the solution.

Sunday, December 02, 2007

Instant Search in Windows 2008 Server


By default, the Instant Search service is not enabled on Windows 2008 server RC0. This makes my search in outlook rather insufficient. Fortunately, there is a solution. Thanks Olav.

Cannot upload big files on IIS7


I have stuck with this problem last week and killed some time trying to figure out what is going on. Finally, I asked the tech support to investigate further. Here is what they have found out: Thanks for the investigation, Andrey!

Thursday, October 18, 2007

Things to remember before going to production


  1. Load testing with best in breed tools.
  2. Scan the Sitecore log files for latest 3 days and...
    • Any exceptions in the Sitecore Log files should be reported to tech support.
    • Any exceptions related to .NET Framework, ASP.NET worker process in the System Event Log should be investigated and reported to tech support.
  3. Special attention should be paid to the Item and Memory threshold warning in the log file.

The important thing to notice is the Page URL. If the front-end pages (not /sitecore/...  pages) are listed in these reports, there could be a potential problem in the code or ways to enhance to logic.

For example, the warning below shows that the timing exceeded the predefined limit:

5736 10:33:36 WARN  Timing threshold exceeded for web page. Milliseconds: 13072.38. Threshold: 7500. Page URL: /Default.aspx

while this message says that the logic of the page is trying to access more that the predefined limit of items:

6548 10:33:49 WARN  Item threshold exceeded for web page. Items accessed: 16715. Threshold: 7500. Page URL: /Default.aspx

So your actions:

  1. Identify the rendering logic producing such delay and heavy logic using Sitecore Debug mode.
  2. Refactor the code according to best practices (more about this below).
  3. Verify that this helped by scanning the log files and using Debug mode.

Best Practices and Techniques:

More about the predefined threshold parameters:

Wednesday, October 17, 2007

Publish related media items


Often users are curious why when they publish articles, the media associated with this article was not published.

There is one simple explanation - media items/assets in Sitecore are considered as separate content items and should be published separately.

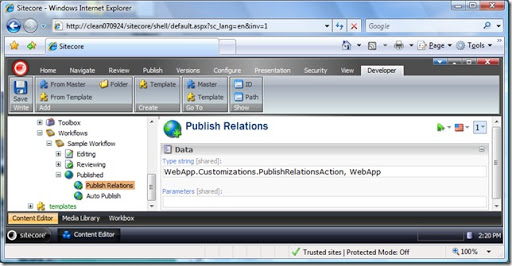
Thanks to the powerful Sitecore Workflow engine that can be easily extended using workflow actions, it is possible to publish related media items by means of a special workflow action.

So by simply adding a workflow action before the Auto Publish action with the logic below, you will ensure that the relations will be published before the actual item:

workflow_actions

The code of the workflow action:

using System;

using Sitecore;
using Sitecore.Configuration;
using Sitecore.Data.Items;
using Sitecore.Links;
using Sitecore.Publishing;
using Sitecore.Workflows.Simple;

namespace WebApp.Customizations
{
    public class PublishRelationsAction
    {
        public void Process(WorkflowPipelineArgs args)
        {
            Item dataItem = args.DataItem;

            // Find all related items
            ItemLink[] itemLinks = dataItem.Links.GetValidLinks();

            foreach (ItemLink link in itemLinks)
            {
                Item itm = link.GetTargetItem();

                // publishing related media items - the ones that were referenced by the workflow item
                // this can be extended - you can publish related aliases also
                if (itm != null && itm.Paths.IsMediaItem)
                {
                    PublishItem(itm);
                }
            }
        }

        private void PublishItem(Item item)
        {
            PublishOptions options = new PublishOptions(PublishMode.SingleItem, item.Language, DateTime.Now);
            options.RootItem = item;
            options.Deep = false;
            options.SourceDatabase = item.Database;
            // publishing to the web database
            // production scenarios may have different publishing targets
            // this can be handled by some more advanced logic,
            // for example retrieving parameterized targets from the workflow action
            options.TargetDatabase = Factory.GetDatabase("web");
            new Publisher(options).Publish();
        }
    }
}

Related reading:

The caveats:

  1. If media items are associated with another workflow, they should be in the final state.
  2. Obviously this solution works when you are using workflow. Other solutions such as handing of publish:end events does not seem to be as easy as workflow action. In this case it could be better to introduce a one step workflow with one initial state "Editing" and final "Published" with such action attached.

Thanks to Alexander Tsvirchkov for investigation and code and Kim Hornung for ideas.

Tuesday, October 16, 2007

LDAP and Sitecore user/role mapping


Sometimes you may need certain users imported from Active Directory through the LDAP module to be associated with some Sitecore-native roles such as default Sitecore 5.3 Client Roles.

In order to accomplish this, you need to customize the LDAPDomain class that is associated with the domain definitions in web.config.

Just create your own class that will inherit from Sitecore.Modules.LDAP.LDAPDomain:

public class LDAPDomain : Sitecore.Modules.LDAP.LDAPDomain
  {
     public LDAPDomain(string domainName, string databaseName)
        : base(domainName, databaseName)
     {

     }

}

Then override the Login method that will call the base implementation of the Login method and post process the AD user:

public override Sitecore.SecurityModel.DomainAccessResult Login(string userName, string password)
       {
           DomainAccessResult loginResult = base.Login(userName, password);
           if (loginResult.Success)
           {
               UserItem user = this.GetUser(userName);
               if (user["Fromldap"] == "1")
               {
                   // Optional: Get the Role that is already imported from AD
                   RoleItem techSupportRole = Sitecore.Context.Domain.GetRole("Technical Support");

                   // Optional: if the role is found and the user is a member of this role
                   if (techSupportRole != null && user.Roles.Contains(techSupportRole.ID))
                   {
                       user.BeginEdit();

                       // getting Sitecore Client Authoring Role
                       RoleItem clientAuthRole = Sitecore.Context.Domain.GetRole(ID.Parse("{DE4E5C04-F820-4406-AEB9-C76144F7D808}"));
                       // Getting Sitecore Maintaining Role
                       RoleItem clientMaintRole = Sitecore.Context.Domain.GetRole(ID.Parse("{E2036D1D-2828-42B9-8D41-1AD2F247C256}"));

                       // assigne the Sitecore Client Authoring Role to the user
                       if (clientAuthRole != null)
                       {
                           user.Roles.AddRole(clientAuthRole.ID);
                       }

                       // assigne the Sitecore Maintaining Role to the user
                       if (clientMaintRole != null)
                       {
                           user.Roles.AddRole(clientMaintRole.ID);
                       }

                       user.EndEdit();
                   }
               }
           }
           return loginResult;
       }

The code is pretty easy and self-explanatory.

Instead of hard-coding the role IDs, you can of course create a Sitecore item that will contain the role mappings, so this logic can read it and apply the rules on the fly.

Thanks to Ivan Sharamok for the idea.

Tuesday, October 09, 2007

Windows Server 2008 RC0 and Visual Studio 2008 Beta2


It is happening, it is definitely happening! Just install the fresh copy of this new generation of the server OS and highly anticipated IDE. I had to enable Aero to experience vast UI enhancement along with the core enhancements :-) Impressions: - Was able to install all the drivers from Vista, even wireless :-) - On my dual core 2.0 Ghz/2Gb laptop performance is comparable to Windows Server 2003 that is still on partition C:\ which is impressive. - It took less to install VS 2008 Pro with SQL Express 2005 than it used to take to install SP1 for VS 2005 which is even more impressive. On top of this package I had to install SQL Management Studio Express, Office 2007. Everything was installed without a single issue! The only thing that I could not install is MSDN - I can live with that and also got unhandled exception when opening the SQL Management Studio, but I was able to login anyways. As a part of the configuration, I had to re-enable Mixed authentication in SQL 2005 to have the "sa" account working and reset the password for this user. What about Sitecore? No problem at all! Just follow the official instructions for installation on Vista and you are up and running! What is the most exciting is that the installation program worked flawlessly (big thanks to Yan) and I did not have to use manual install. Looking forward to explore new features of IIS7 and Visual Studio 2008!

Tuesday, July 17, 2007

Editing media files through the UI


You may need to let your business users edit the physical files that your media items point to. Since reuploading a file will cause creation of another media item and you will have to reconnect the content item with media item, this could be too complex for business users.

This then the following approach can be used.

First of all, a special button should be added to the media tab. In order to do this, go to the core database -> and create a button under /sitecore/system/Ribbons/Contextual Ribbons/Media/Media/Media. The easiest way will be to duplicate the existing Download button and change the name to something more appropriate, e.g. "Edit File". Set the following properties:

  • Header = Edit File
  • Icon = Applications/16x16/contract.png
  • Click = media:edit
  • Tooltip = Edit the file.

The Click field is the most important. This value will connect the button with the execution logic.

Next step will be to define the "media:edit" command. Open the \app_config\Commands.config file and add something like:

<command name="media:edit" type="WebApp.Shell.Framework.Commands.Media.Edit,WebApp" />

This will tell Sitecore to look up the "WebApp.Shell.Framework.Commands.Media.Edit" class in the WebApp assembly from the bin folder.

So the only thing that is left to do is to compile the code that will execute an application to edit the file.

The code is represented below:

using Sitecore; using Sitecore.Data; using Sitecore.Data.Items; using Sitecore.Shell.Framework; using Sitecore.IO; using Sitecore.Text; using Sitecore.Shell.Framework.Commands;

namespace WebApp.Shell.Framework.Commands.Media { public class Edit : Command { public override void Execute(CommandContext context) { foreach (Item item in context.Items) { string filename = item["file path"]; if (FileUtil.FileExists(filename)) { UrlString url = new UrlString(); url.Append("fi", filename); if (filename.EndsWith(".xml", StringComparison.OrdinalIgnoreCase)) { Windows.RunApplication("Layouts/IDE", url.ToString()); return; } } } } } }

This is basically a class that inherits from the Command base class and contains one single method "Execute" that is fired whenever the button is clicked.

In the logic of this method we simply get the currently selected media item, get the physical path and check if this is an XML file. If it is, we execute the Developer Center application that allows us to edit and save the file. You can modify the logic to fit your needs.

This is how it looks like:

Note that this scenario deals with file system media storage. In case of database storage you will be able to download the media file from the blob field and reattach it to the same media item.
Monday, June 25, 2007

Briefly about HTTP Request Begin Pipeline


Though SCD2 Training mentions this quite interesting and sometimes useful topic, I decided to give a quick overview of what happens with the HTTP request when it comes to Sitecore.

  • IgnoreList – checks if the requested page is in the ignore URL list in the web.config. The setting is called “IgnoreUrlPrefixes”. If such page is defined, the pipeline terminates.
  • SiteResolver – resolving the site name either by the sc_site query string value or by host name or virtual folder name got as a result of parsing the incoming URL.
  • DatabaseResolver – getting the Sitecore context database by the sc_database query string.
  • DeviceResolver – getting the current Sitecore device by query string, User Agent or in any other supported way.
  • LanguageResolver getting Sitecore context language by the sc_lang query string.
  • CustomHandlers – triggers custom handlers that are defined in the <customHandlers /> section.
  • FilterUrlExtensions – define the allowed/blocked extensions that will be either streamed or not.
  • QueryStringResolver – analyzing such query string as “sc_itemid”. If the ID specified as the value is valid and if the item is found in the context database, then the returning item is set as a context item.
  • AliasResolver – if the requested URL matches an alias that exist in the system, Sitecore processes either external URL or the real item that is associated with this alias.
  • DefaultResolver – getting the start path item for the context site. Sitecore instantiates this item using the “RootPath” and “StartItem” attributes of the context site by simply concatenating these values.
  • ItemResolver – getting the Sitecore context item by the incoming URL.
  • LayoutResolver – returning the presentation logic for the resolved item.
  • ExecuteRequest – context path rewrite and handling of the “item not found”/”layout not found” errors.

Wednesday, June 13, 2007

Insert Sitecore Link dialog - another icon


This could be irritating for some editors as the icons for the Sitecore Internal Link dialog and Hyperlink Manager are the same.

You can change it by changing the Icon field of the "Insert Sitecore Link" item: /sitecore/system/Settings/Html Editor Profiles/<name of the profile that you use>/Toolbar 1/Insert Sitecore Link

Here is the image you can use as a source.

Copy this image to \sitecore\shell\RadControls\Editor\Skins\Monochrome\Buttons\

Here is the result: Look much better now and less confusing for the editors. Please don’t forget to copy the file when upgrading in future.

Friday, May 18, 2007

Adding User Activation Step


You may have a requirement to have user activation in your solution.

The easiest way to do this is to extend the User template in the Security Tempalates.xml file by adding an additional field that will serve as an activation flag defining if the user can be logged in. After that you will add additional step to the login process pipeline and abort it if the user is not activated.

So here are the steps:

1. Add an additional field named “Active” for the User template as you have already did for the profiles:

<field id="{E20FD18B-6F85-4A71-A086-BEE3C0546211}" name="Active" icon="" shared="1" sortorder="" source="" style="" type="checkbox" unversioned="1"/>

After that you should be able to see the Active checkbox in the User Properties window.

2. Compile the following code and place to the bin folder:

using Sitecore.Pipelines.Login;

namespace WiseBusiness.Pipelines.Login { public class IsActive { public void Process(LoginArgs args) { // we do not want to check security for the anonymous user // also we exclude admins from this process if (Sitecore.Context.IsLoggedIn && !(Sitecore.Context.IsAdministrator) &amp;& !(Sitecore.Context.User.InnerItem["Active"] == "1")) { args.Success = false; args.Warning = String.Format("Your login was not successful, the user {0} is not activated.", args.Username); args.Abort(); } } } }

3. Add this processor definition to the web.config below the Sitecore.Pipelines.Login.Login processor:

<login argsType="Sitecore.Pipelines.Login.LoginArgs">

... <processor mode="on" type="Sitecore.Pipelines.Login.Login, Sitecore.Kernel" /> <processor mode="on" type="WiseBusiness.Pipelines.Login.IsActive, webapp" /> ...

</login>

Notes:

1. Developed for 5.3.1 (rev. 070417)

2. Was not thoroughly tested, so provided "as is".

Tuesday, April 17, 2007

Windows Server Code Name Longhorn


Just installed the April CTP version of this amazing product on my new dual core 2.0 Ghz/2Gb laptop.

The first step was to make it look like Vista.

Next thing was to disable the enhanced internet security configuration from the Control Panel. Feels good! Looking forward to go through the labs to get into IIS7.

Performance? I will add the SQL Server and Visual Studio and we'll see. It is pretty fast right now.

Technorati tags:

Thursday, April 12, 2007

Security Wise User Manager


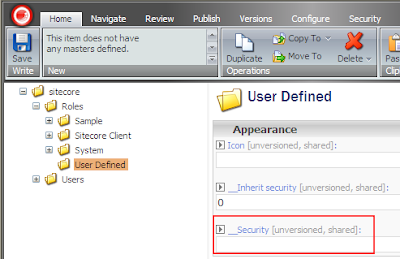
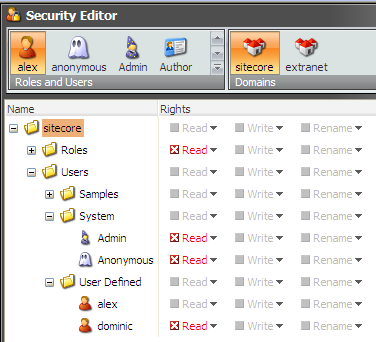
This applies to Sitecore 5.3. The problem. As you may know, by default it is not possible to restrict access to certain security items in the security or extranet databases. You can check it by going to the security or extranet database and trying to set permissions in the Security Editor, the application just won't let you deny access to a specific item. The reason is that these items do not have the necessary system field named "__Security" that stores the security assignments. The background. There could be a requirement for certain users to see only a subset of users and roles. For example, Biology department should not manage users from another departments. The solution. So the first step to make it happen is to modify the security templates to include the field which will be storing the security definitions. This file is stored under "/sitecore/shell/" and it is called "security templates.xml" and the purpose of this file is to define the data structure of the security templates which are created on the fly using these XML definitions. The following field definition should be added to the Folder, Role and User templates. The section you are adding to is not important but it is preferred to add the fields to the Data section (create it if it is not there yet). <field id="{DEC8D2D5-E3CF-48B6-A653-8E69E2716641}" name="__Security" icon="" shared="1" sortorder="" source="" style="" type="text" unversioned="1" /> The attributes in bold are important. The id attribute should be set to the "__Security" field ID and the name is important as well. After this change, IIS restart and browser reopen is required. You should see the following picture in the Content Editor when browsing the security and extranet databases: This means that now you can deny read access in the security or extranet databases: It is not all that you should do though, because the User Manager won't just respect this security settings. So the second step is to override this application. It is fairly simple: 1. Copy the XML control source file named Security manager.xml from "\sitecore\shell\Applications\Security\Security manager\" to "\sitecore\shell\override". 2. Don't forget about this when upgrading :-) 3. Compile the following code for this form and place the assembly to the bin folder. Here is the source: using System; using System.Data; using System.Configuration; using System.Web; using System.Web.Security; using System.Web.UI; using System.Web.UI.WebControls; using System.Web.UI.HtmlControls; using System.Collections; using Sitecore; using Sitecore.Data; using Sitecore.Data.Items; using Sitecore.SecurityModel; using Sitecore.Configuration; using Sitecore.Web.UI.HtmlControls; namespace WiseBusiness.Shell.Security { public class CustomSecurityManagerForm : Sitecore.Shell.Applications.Security.SecurityManager.SecurityManagerForm { private ArrayList deniedItems = new ArrayList(); protected override void OnLoad(EventArgs e) { base.OnLoad(e); if (!Sitecore.Context.ClientPage.IsEvent) { // we should respect administrators if (!Sitecore.Context.User.IsAdministrator) { // fill the array list of item the current user does not have access to GetDeniedItems(); string deniedItemIDs = ArrayListToString(deniedItems, ","); if (deniedItemIDs != string.Empty) { // setting the data context excluding items that the current item does not have access to this.FilteredDataContext.Filter = "not(Contains('" + deniedItemIDs + "', @@id))"; this.DataContext.Filter = "not(Contains('" + deniedItemIDs + "', @@id))"; } } } } private string ArrayListToString(System.Collections.ArrayList ar, string delim) { return string.Join(delim, (string[])ar.ToArray(typeof(string))); } private void GetDeniedItems() { // getting the selected domain Database database = Factory.GetDomain(this.Domain).Database; if (database != null) { // checking security recursively ProcessItem(database.GetRootItem()); } } private void ProcessItem(Item parent) { foreach (Item child in parent.Children) { using (new SecurityDisabler()) { // check if the context user cannot read the current item if (child.SecurityField.GetRights(Sitecore.Context.User, true) == ItemRights.DenyRead) { deniedItems.Add(child.ID.ToString()); } } ProcessItem(child); } } } } The comments in the code should help to understand the concept. If not, shoot me a message. The key things: - Inheriting from the existing User Manager form. - Calling the base OnLoad method thanks to the power of inheritance. - Modifying the FilteredDataContext's and DataContext's filters to exclude security items that the current user does not have access to. 4. Make the following change in the XML control source file to reference the newly compiled class (as usual): <CodeBeside type="WiseBusiness.Shell.Security.CustomSecurityManagerForm,WiseBusiness" /> Here is the resulting picture in the User Manager for the user: As can be seen, this user cannot see the roles container, system users and user named dominic. Of course, the code might be far from perfect but I am open to suggestions! Update: this will be addressed in next major release.

Friday, February 09, 2007

Get media path by file path


This code snippet applies to 5.1.1/5.2.

Here is the code snippet that does the job:

string fullPath = @"D:\wwwroot\Clean5.2.0.12\upload\images\Devil-Skype!.png";

// mapping the path

string mappedPath = Sitecore.Resources.Media.MediaPath.MapPath(fullPath);

// switching the context to shell

Sitecore.Context.SetActiveSite("shell");

// setting the actual media path

string mediaPath = Sitecore.Resources.Media.MediaPath.CreatePath(mappedPath).Paths.FullPath;

// next you may switch back to website

The site switch is necessary since the CreatePath method deals with the content database of the context site which is null for the website by default.

If you don’t want to change the site context, you should add the content database definition to the website:

<site

name="website"

...

content="master" or “web”

...

This way your code will look like:

string fullPath = @"D:\wwwroot\Clean5.2.0.12\upload\images\Devil-Skype!.png";

string mappedPath = Sitecore.Resources.Media.MediaPath.MapPath(fullPath);

string mediaPath = Sitecore.Resources.Media.MediaPath.CreatePath(mappedPath).Paths.FullPath;

Thursday, February 08, 2007

Publish at a specific time


The nature of the Sitecore scheduled operation is cyclic. The task’s execution time relies on the frequency and interval parameters in the web.config file. This approach has significant benefits. Since there is no way to either prevent the ASP.NET process from recycling or predict the recycle time, the cyclic approach makes it easier to guarantee that your scheduled task will be executed in next timeframe despite ASPNET process terminates the task execution. However, sometimes it is necessary to call a task at a specific time. The best example is the publishing task. This module approaches this scenario. The module’s architecture is depicted below: So the module consists of two components: 1. Console Windows application that invokes a web service. 2. Web Service that calls Sitecore publishing operation. Here you can download archive with the documentation and the module itself. Any feedback is really appreciated.

Monday, January 08, 2007

Proxy Items in 5.3


Here are some details on how the proxy items work in 5.3. Some sample code on how to create a proxy item: public void CreateProxyItem(string name) { Sitecore.Data.Database masterDB = Sitecore.Configuration.Factory.GetDatabase("master"); // getting a proxy template from the template repository Sitecore.Data.Items.TemplateItem proxyTemplate = masterDB.Templates[Sitecore.TemplateIDs.Proxy]; using (new Sitecore.SecurityModel.SecurityDisabler()) { // getting referece to the proxy container item Sitecore.Data.Items.Item proxyContainerItem = masterDB.Items["/sitecore/system/proxies/"]; if (proxyContainerItem != null && proxyTemplate != null) { Sitecore.Data.Items.Item proxyItem = proxyContainerItem.Add(name, proxyTemplate); proxyItem.Editing.BeginEdit(); proxyItem.Fields[Sitecore.FieldIDs.ProxySourceItem].Value = "{F5726884-BDBE-4DDD-9EBE-BB166E68E1EF}"; proxyItem.Fields[Sitecore.FieldIDs.ProxyTargetItem].Value = "{C3F3DBA9-87B3-4EB3-84CF-D75BD7FED626}"; proxyItem.Editing.EndEdit(); } } }

Tuesday, January 02, 2007

Cannot see the template folder?


This is applied to Sitecore 5.3 061102. If you create a folder (template container) for your custom templates in the Template Manager, you might not see this folder in the dialog when adding an item from a template or changing the template. The solution is to edit the \sitecore\shell\Controls\Data\TemplateDataContext.xml file to include the GUID of the template "Template Folder" that is placed under /sitecore/templates/system/templates/. The Filter attribute of the DataContext definition should be edited:
before: Filter="Contains('{E3E2D58C-DF95-4230-ADC9-279924CECE84}, {...}, {...}', @@templateid)"
after: Filter="Contains('{0437FEE2-44C9-46A6-ABE9-28858D9FEE8C},{...}, {...}', @@templateid)"
where {0437FEE2-44C9-46A6-ABE9-28858D9FEE8C} is the GUID of the "Template Folder" template.