Thursday, June 29, 2006

Extending the Preview flyout panel


The steps below show how to extend the preview flyout panel by adding a space to display the current workflow state of the context item. 1. Locate the Portal item under content/Applications/Preview item in the core database. 2. Add an item from the Portlet template:
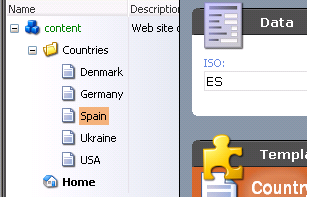
3. Fill the necessary fields such as it is shown above.
4. Create a folder under sitecore\shell\Applications\Preview\Portlets\ 5. Create an XML file with the following source code:

<?xml version="1.0" encoding="utf-8" ?>

<control xmlns:def="Definition" xmlns="http://schemas.sitecore.net/Visual-Studio-Intellisense">

<PreviewCurrentWorkflowPortlet

def:inherits="Custom.Portlets.PreviewCurrentWorkflowPortletXmlControl,CurrentWorkflowPortlet">

<Border def:ID="Portlet">

<DefaultPortletWindow def:ID="Window" Header="Workflow Details" Icon="Network/16x16/inbox.png">

<Border def:ID="Body"/>

<Literal def:ID="Workflow" Text="Workflow: " />

<br />

<Literal def:ID="WorkflowState" Text="Workflow State" />

</DefaultPortletWindow>

</Border>

</PreviewCurrentWorkflowPortlet>

</control>

6. Create a class that will stand for this XML control. Compile it and place into the bin folder. using System; using Sitecore; using Sitecore.Data.Items; using Sitecore.Web.UI.XmlControls; using Sitecore.Web.UI.HtmlControls; namespace Custom.Portlets { public class PreviewCurrentWorkflowPortletXmlControl : XmlControl { protected Border Body; protected Border Portlet; protected XmlControl Window; protected Literal WorkflowState; protected Literal Workflow; protected override void OnLoad(EventArgs e) { base.OnLoad(e); if (!Sitecore.Context.ClientPage.IsEvent) { this.Window.ID = this.ID + "_window"; this.Portlet.Attributes["id"] = this.ID; Item item = UIUtil.GetItemFromQueryString(Sitecore.Context.ContentDatabase); string workflowID = item.Fields["__Workflow"].Value; string stateName = "none"; string workflowName = "none"; if(workflowID != "") { stateName = GetState(item, Sitecore.Context.Database, workflowID).DisplayName; workflowName = Sitecore.Context.Database.Items[new Sitecore.Data.ID(workflowID)].Name; } this.WorkflowState.Text += stateName; this.Workflow.Text += workflowName; } } private Sitecore.Workflows.WorkflowState GetState(Sitecore.Data.Items.Item item, Sitecore.Data.Database database, string workflowID) { // getting the workflow provider for the master database Sitecore.Workflows.IWorkflowProvider provider = database.WorkflowProvider; // getting the Simple workflow through the IWorkflow interface Sitecore.Workflows.IWorkflow iWorkflow = provider.GetWorkflow(workflowID); return iWorkflow.GetState(item); } } } 7. Add the reference to this dll into the web.config (UI » References section): /bin/CurrentWorkflowPortlet.dll The result of these actions is depicted below:

How to make lookup field to retrieve the field value rather than item name


How to make lookup field to retrieve the field value rather than item name For example, you want to refer to the Country items from your custom lookup field: content ---home -------countries ----------------Ukraine ----------------Denmark ----------------Germany ----------------USA ----------------Spain If you specify just a source field of your template field as /content/countries, you will get this field populated with the item names. But there is also a possibility to retrieve the field values of these items rather that the names. Let’s assume that these items are based on the Country template that defines a single field named ISO: If you want to have a custom lookup field populated with the ISO field values instead of the item’s name, the following steps should be completed: Add the custom lookup field named List to e.g. Document template: Extend the Template field template by adding a field named Field Name which will define the name of the field to fill into the lookup dropdown list: Fill the newly created field with the ISO value – name of the field to retrieve the values from: Now you have to customize the source code of your custom lookup field. Here is the full source code of the custom lookup field. The instructions about how to add a custom field to Sitecore shell can be found here: http://sdn5.sitecore.net/Articles/API/ Creating%20a%20Composite%20Custom%20Field/ Adding%20a%20Custom%20Field%20to%20Sitecore%20Client.aspx using System; using System.Text; using Sitecore; using Sitecore.Data; using Sitecore.Data.Items; using Sitecore.Shell.Applications.ContentEditor; using Sitecore.Web.UI.Sheer; using Sitecore.Web.UI.HtmlControls; using Sitecore.Web.UI.HtmlControls.Data; namespace Sitecore.Shell.Applications.ContentEditor { public class CustomLookup : Lookup { protected override void OnLoad(EventArgs args) { if (!Sitecore.Context.ClientPage.IsEvent) { Item contextItem = Sitecore.Context.ContentDatabase.Items[this.ItemID]; foreach(TemplateFieldItem tfItem in contextItem.Template.OwnFields) { if(tfItem.Source == this.Source) { FieldName = tfItem.InnerItem.Fields["Field Name"].Value; } } } base.OnLoad(args); } } } Here we have overridden the OnLoad method with the code that sets the FieldName property to the value of the field. There are some tricks made here since we do not know the name of the current field (List in our case), we had to iterate thorough the template’s own field of the context item and check the Source property. If the sources match, the FieldName property is set to the value of the template field (ISO in our case). The result of the actions above are depicted below:

Exporting the broken link report


This is some instructions on how to add an Export button to the Broken Links application. Upon clicking, you can export the results of the broken link search to any location, e.g. Excel worksheet, XML file, etc. The sample code below outputs the results to the log file. 1. Add a command under /content/applications/tools/broken links/commands: 2. Fill the fields as it is shown above. 3. Find the XML control that stands for the Broken Link dialog. It can be found here: \sitecore\shell\Applications\Tools\Broken links\Broken links.xml 4. Substitute the code beside definition with your custom class as it is shown below: <CodeBeside Type="Custom.CustomBrokenLinksForm,BrokenLinksForm"/> where Custom.CustomBrokenLinksForm is the full class name with namespace, BrokenLinksForm is the name of the assembly. 5. Create and compile the following sample code into the bin directory. This class outputs the broken link results into the log file. You can implement your own logic here to export it to any file. using System; using Sitecore; using Sitecore.Jobs; using Sitecore.Links; using Sitecore.Web.UI.Sheer; using Sitecore.Resources; using Sitecore.Diagnostics; namespace Custom { public class CustomBrokenLinksForm : Sitecore.Shell.Applications.Tools.BrokenLinks.BrokenLinksForm { [HandleMessage("brokenlinks:export")] protected void Export(Message message) { Context.ClientPage.ClientResponse.Timer("StartExport", 10); } public void StartExport() { Context.ClientPage.ServerProperties["handle"] = LinkDatabaseProxy.GetBrokenLinks(Context.ContentDatabase).ToString(); CheckExportStatus(); } protected void CheckExportStatus() { Handle handle = Handle.Parse(Context.ClientPage.ServerProperties["handle"] as string); JobStatus status = LinkDatabaseProxy.GetStatus(handle); if (status.Failed) { Sitecore.Context.ClientPage.ClientResponse.ShowError("An error occured.", StringUtil.StringCollectionToString(status.Messages)); } else if (status.State == JobState.Finished) { ExportReport(status); } else { Context.ClientPage.ClientResponse.SetInnerHtml("Report", "
" + Images.GetImage("Applications/48x48/exchange.png", 0x30, 0x30) + " Processed: " + status.Processed.ToString() + "
"); Context.ClientPage.ClientResponse.Timer("CheckExportStatus", 500); } } protected void ExportReport(JobStatus status) { ItemLink[] linkArray = status.Result as ItemLink[]; Log.Info("Exporting the broken link results into Excel worksheet...", this); if(linkArray.Length == 0) { Log.Info("There were no broken links found. ", this); } else { foreach(ItemLink itemLink in linkArray) { Log.Info(String.Format("Broken link found. SourceDatabaseName: {0}, SourceFieldID: {1}, SourceItemID: {2}, TargetDatabaseName: {3}, TargetItemID: {4}, TargetPath: {5}.", itemLink.SourceDatabaseName, itemLink.SourceFieldID, itemLink.SourceItemID, itemLink.TargetDatabaseName, itemLink.TargetItemID, itemLink.TargetPath), this); } } Context.ClientPage.ClientResponse.SetInnerHtml("Report", "The export process is finished."); } } }

Adding the Save As button to Image Editor


You can customize Image Editor and add "Save As" button. Here are steps: 1) Copy Image Editor XAML application from "\sitecore\shell\Applications\Media\Imager\Imager.xml" to "\sitecore\shell\Override\" folder. 2) Change CodeBeside e.g.: <CodeBeside Type="CustomImagerForm.CustomImagerForm, CustomImagerForm"/> 3) Create a custom code beside class that inherits from Sitecore.Shell.Applications.Media.Imager.ImagerForm 4) Here is the example code: using System; using System.IO; using Sitecore; using Sitecore.Text; using Sitecore.Data; using Sitecore.Data.Items; using Sitecore.Shell; using Sitecore.Shell.Applications.Media.Imager; using Sitecore.Web.UI.Sheer; namespace CustomImagerForm { public class CustomImagerForm: ImagerForm { [HandleMessage("imager:saveas", true)] protected void SaveAs(ClientPipelineArgs args) { if (args.IsPostBack) { if (((args.Result == null) || (args.Result.Length <= 0)) || (args.Result == "undefined")) { return; } string lastFile = this.GetWorkFile(this.Work); SaveAsNewImage(lastFile, args.Result); } else { Context.ClientPage.ClientResponse.Input("Please input new name without extension? ", "NewName"); args.WaitForPostBack(); } } #region Private Method private void SaveAsNewImage(string oldName, string newImage) { oldName = MainUtil.MapPath(oldName); newImage = String.Concat(Path.GetDirectoryName(MainUtil.MapPath(this.File)), @"\" , newImage , Path.GetExtension(oldName)); System.IO.File.Copy(oldName, newImage, true); } private string GetWorkFile(int index) { ListString listFiles = new ListString(this.UndoList, '|'); string lastFile = listFiles[index]; return lastFile.Substring(0, lastFile.IndexOf("*")); } #endregion Private Method } } I’ve attached this class. 5) Go to Sitecore client and switch to Core database 6) Duplicate node /content/Applications/Media/Imager/Toolbar/Resize to /content/Applications/Media/Imager/Toolbar/SaveAs and place a message “imager:saveas” to the Click field. In the Icon filed you can place your the appropriate icon. So, when you click SaveAs, the new file name without extension will be requested and aftewards Image Editor saves edited image to new one.

Media Library: problem with uploading


If you experience that after uploading media items are not showing in the Media Library while physical files were copied into the upload folder, the following instructions should fix the problem. 1. Open the Access Viewer. 2. Ensure that the Inherit checkbox is set for the Masters node for the sitecore/anonymous user. 3. The sitecore/anonymous user should have all allowed security rights for the whole media library. 4. Check also that the Everyone group has the same security setup. I.e. this user (sitecore/anonymous) should have rights for the Media Library where the items are created and for the masters the media items are created from since these actions are performed under this account.

Creating Debug Item button


You may consider adding a button to the Content Editor’s toolbar and context menu that will start the debugging of the selected item. Here are the steps: 1. Create a new command named Debug under /Content/System/Commands in the core database. 2. Fill all necessary fields in the newly created command. Pay attention to the following ones: • Click – you can set some arbitrary value here, for example item:debug. • Type – specify namespace.class_name,assembly_name here of the class which is shown below: using System; using Sitecore; using Sitecore.Data.Items; namespace Sitecore.Shell.Commands { public class DebugItem : CommandBase { public override bool Execute(Item[] itemArray) { Context.ClientPage.ClientResponse.Eval("window.open('/?sc_itemid=" + itemArray[0].ID.ToString() + "&sc_debug=1', '_blank')"); return true; } public override CommandStatus QueryStatus(Item[] itemArray2) { return CommandStatus.Normal; } } } As can be seen, we inherited this class from the CommandBase class. The key method is named Execute where we are opening the selected item in debug mode in new window. The QueryStatus method is obligatory to be overridden. 3. Navigate to System/Shell/__Default/Commands and Add “Debug” to the Commands multilist field That’s all, the command should be present in the context menu. After clicking, you should get the selected item in the debug mode. Note that the selected item should be present in the web database, otherwise, the home node will be shown upon clicking on the Debug command.