Thursday, December 18, 2008

Who moved the item to the workflow state?


Applies to Sitecore 6.0.
In the workflow scenarios with "rejection" commands when an item is moved to a previous workflow state, sometimes necessary to notify the user who submitted the item in the first place.
Since Sitecore keeps track of workflow activities and writes everything into WorkflowHistory table, there are also APIs to retrieve such information.
The code snippet below shows how it can be done.

protected override string GetRecipient(WorkflowPipelineArgs args)
 {
    IWorkflowProvider workflowProvider = Context.ContentDatabase.WorkflowProvider;
 
    if (workflowProvider != null)
    {
       IWorkflow workflow = workflowProvider.GetWorkflow(args.DataItem[FieldIDs.Workflow]);
 
       if (workflow != null)
       {
          WorkflowEvent[] history = workflow.GetHistory(args.DataItem);
          if (history.Length > 0)
          {
             WorkflowEvent wfEvent = history[history.Length - 1];
             string fullUserName = wfEvent.User;
 
             if (User.Exists(fullUserName))
             {
                System.Web.Security.MembershipUser mUser = Membership.GetUser(fullUserName);
 
                if (mUser.Email != string.Empty)
                {
                   return mUser.Email;
                }
             }
          }
       }
    }
 
    return string.Empty;
 }

This method can be a part of workflow email action that is associated with the "Reject" command.
Related links:

Don't you just love Sitecore workflow?

Thursday, December 11, 2008

Changing the application pool identity for Sitecore


Though the Sitecore installer does not support Windows authentication yet, it is possible to reconfigure the system manually after the installation.
In production environments where security considerations represent a major concern, using a SQL user as well as having username and password specified as clear text in the connection string might be undesirable.
Production SQL Server boxes generally reside on a different machine that do not have access to the account the Sitecore application process in authenticated. That’s why the same domain user should be used for both Windows authentication on the SQL Server box and the application pool identity on the web server where Sitecore is running.

Here are the steps to configure this:

  1. Find the application pool that your Sitecore is running under. Open Properties and set the identity to the domain user on the corresponding tab.
  2. On the SQL Server box register the domain user and grant security permissions on Sitecore databases for the domain user according to the section “3.7.2 Creating a Database Account for Sitecore CMS Databases on SQL Server 2005” of the Installation Guide.
  3. On the machine that hosts Sitecore add this domain user to the IIS_WPG group.
  4. Adjust the permissions for the IIS_WPG group according to this section of the Installation Guide “3.6 Configuring Folder Permissions”.
  5. Edit the /App_Config/ConnectionStrings.config file and replace the user id and password parameters with the trusted_connection=yes option:
  6. <?xml version="1.0" encoding="utf-8"?>
      <connectionStrings>
        <add name="core" connectionString="Data Source=.\sql2008;Database=Sandbox6_Core;Trusted_Connection=Yes" />
        <add name="master" connectionString="Data Source=.\sql2008;Database=Sandbox6_Master;Trusted_Connection=Yes" />
        <add name="web" connectionString="Data Source=.\sql2008;Database=Sandbox6_Web;Trusted_Connection=Yes" />
    </connectionStrings>
  7. Prepare your identity so it can be used as a service account with “aspnet_regiis.exe” and the -ga switch.
  8. Adjust your global.asax so two methods are executed on Application_Start:
    public void Application_Start()
    {
       System.Security.Cryptography.RSACryptoServiceProvider.UseMachineKeyStore = true;
       System.Security.Cryptography.DSACryptoServiceProvider.UseMachineKeyStore = true;
    }

Notes:
- Anonymous access to the website is still enabled, using the IUSR account. Also the impersonation is still disabled in the web.config as by default.
- ASP.NET cannot send NT credentials over network if SQL server name is resolved using HOSTS file though accessing the same server using NetBIOS name or IP address works fine.

Thursday, December 04, 2008

How to bring a webform to Sitecore desktop


Applies to both Sitecore 5 and Sitecore 6.

If you need to bring a custom built web form (aspx) to Sitecore's desktop, it is pretty easy to do.

First, you need a webform residing under the root of your web site, for example, /forms/testform.aspx.

Then you need to create a reference to this webform from the core database under /sitecore/content/Applications:
app_definition
Just fill out the necessary "Application" field with the relative path to your .aspx (/forms/testform.aspx). Here you can also specify additional parameters such as icon, size of the app, tooltip, etc.
This is the definition of your application.

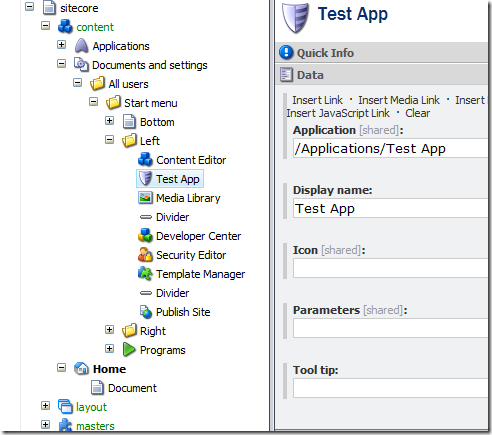
After this, add a shortcut to the app from either "Bottom", "Left", "Right" or "Programs" menus under /sitecore/content/Documents and settings/All users/Start menu.
In the "Application" field, just put the path to the item containing the definition of your app created previously:
app_reference

That's it! Now you can launch your app within Sitecore Desktop:
 start_menu

result_custom_app

Now if you want to access Sitecore context objects (Items, Database, Fields, etc.) it is recommended to create a custom site for that purpose and associate it with the folder hosting your custom forms:

<sites>
   <site name="shell" virtualFolder="/sitecore/shell" physicalFolder="/sitecore/shell" rootPath="/sitecore/content" startItem="/home" language="en" database="core" domain="sitecore" loginPage="/sitecore/login" content="master" contentStartItem="/Home" enableWorkflow="true" xmlControlPage="/sitecore/shell/default.aspx" browserTitle="Sitecore" htmlCacheSize="2MB" registryCacheSize="3MB" viewStateCacheSize="200KB" xslCacheSize="5MB" />
   ...
   <site name="custom_forms" virtualFolder="/forms" physicalFolder="/forms" rootPath="/sitecore/content" startItem="/home" language="en" database="core" domain="sitecore" content="master" enableWorkflow="true" />
 
   <site name="website" virtualFolder="/" physicalFolder="/" rootPath="/sitecore/content" startItem="/home" database="web" domain="extranet" allowDebug="true" cacheHtml="true" htmlCacheSize="10MB" registryCacheSize="0" viewStateCacheSize="0" xslCacheSize="5MB" filteredItemsCacheSize="2MB" enablePreview="true" enableWebEdit="true" enableDebugger="true" disableClientData="false" />
   ...
 </sites>

After that you can have code like this work: Sitecore.Context.Site.Name

Enjoy!