Sitecore 5.1 instructions:
|/sitecore modules/forum/web/|/users/avatar.aspx|/rss.aspx
Sitecore 5.2 instructions:
Sitecore 5.1 instructions:
|/sitecore modules/forum/web/|/users/avatar.aspx|/rss.aspx
Sitecore 5.2 instructions:
Here is an easy way to output an image tag from an image field with possibility to use some new enhancements provided in 5.3.
Sitecore.Xml.Xsl.XslHelper xslhelper = new Sitecore.Xml.Xsl.XslHelper();
string output = xslhelper.image("ImageField", Factory.CreateItemNavigator(Sitecore.Context.Item).Select("."));
Response.Write(output);
1) In Sitecore 5.3 this code returns the home children in the same way as in Shell UI:
Item root = db.Items["/sitecore/content/home"];
ChildList list = root.GetChildren(ChildListOptions.IgnoreSecurity);
foreach (Item itm in list) { Response.Write(itm.Name); }
2) Sitecore sorts children according to their SortOrder field firstly.
3) If items do not have the SortOrder field filled or the values are equal Sitecore sorts it according to “Subitems Sorting” field value of the parent item.
4) You can apply your own sorting by writing your own IComparer. Please add your own
/sitecore/system/Settings/Subitems Sorting/* comparer with such code structure:
public class CreatedComparer : Comparer
{
protected override int DoCompare(Item item1, Item item2)
{
// return item1.Statistics.Created.CompareTo
// (item2.Statistics.Created);
return {0 or 1 or -1};
}
}
5) Note: you can apply this to all the items based on a certain template by setting it via “Standard Values”.
Why not? What if you want the extranet users to upload media to the master database? No problem with that! Just follow these easy steps to accomplish this.
Step 1: add a new pipeline to the <processors> section in the web.config:
<frontendUpload>
<processor mode="on" type="Sitecore.Pipelines.Upload.Save, Sitecore.Kernel" />
</frontendUpload>
Step 2: Add the FileUpload control to your layout (web form):
<asp:FileUpload ID="FileUpload1" runat="server" />
This control will be used to select a image for uploading.
Step3: in the code behind of a layout you should add the following code for example in the button click handler.
// defining if a file is being uploaded
if (FileUpload1.PostedFile != null)
{
// disabling security in order to create a media item
using (new Sitecore.SecurityModel.SecurityDisabler())
{
// creating necessary arguments to be passed to the processor
UploadArgs args = new UploadArgs();
// adding http files collection
args.Files = base.Request.Files;
// a media path where the media item will be created
args.Folder = "/sitecore/media library/Files";
// we may want to override existing media items
args.Overwrite = true;
// we do not need to choose this option since we are uploading images, not archives
args.Unpack = false;
// turning on versioning for the uploaded item
args.Versioned = true;
// selecting a language in which the media item will be created
args.Language = Sitecore.Globalization.Language.Parse("en");
// we are uploading to the database
args.Destination = UploadDestination.Database;
// if we are uploading to the master database, we need to change the active site
Sitecore.Context.SetActiveSite("shell");
// starting the pipeline previously added to web.config
PipelineFactory.GetPipeline("frontendUpload").Start(args);
// the media item is created. Now we can do whatever we want with the uploaded items
// for exampe, programmatically populate the Alt fields
foreach (Item itm in args.UploadedItems)
{
itm.Editing.BeginEdit();
itm.Fields["Alt"].Value = "Set from API";
itm.Editing.EndEdit();
}
// setting the active site back
Sitecore.Context.SetActiveSite("website");
}
}
else
{
Response.Write("No file is posted.");
}
 Nothing difficult, but I thought this might be interesting anyway.
 So we need to implement a workflow which provides us with a possibility to schedule item deletion and finally unpublish it from the front end upon confirmation.
The key point is additional workflow state named "Deletion Pending" which is referred by the "Schedule for Deletion" command.It has two commands: "Confirm Deletion" and "Reject Deletion". The first command unpublishes item and the second returns it to the "Published" state.
The "Process" method that is invoked by the "Unpublish" workflow action looks like this:
public void Process(WorkflowPipelineArgs args) { Error.AssertObject(args.DataItem, "args.DataItem"); Item item = args.DataItem;
Database web = Factory.GetDatabase("web"); Database master = Factory.GetDatabase("master");
using (new Sitecore.SecurityModel.SecurityDisabler()) { DeleteItem(web, item); DeleteItem(master, item);
// RemoveLinks(item); LinkManager.UpdateLink(item); }
Sitecore.Context.ClientPage.SendMessage(this, String.Format("item:refresh(id={0})", item.ID)); }
private void DeleteItem(Database db, Item item) { if (db.Items[item.ID] != null) { db.Items[item.ID].Delete(); Log.Info(String.Format("Item {0} was deleted from the {1} database using the workflow command.", item.Paths.FullPath, db), this); } else { Log.Info(String.Format("Deletion for the item {0} failed for the {1} database. Item not found.", item.Paths.FullPath, db), this); } }
I've found two cons so far:
Good luck.

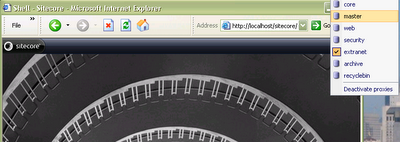 It turned out that nothing is impossible in Sitecore.
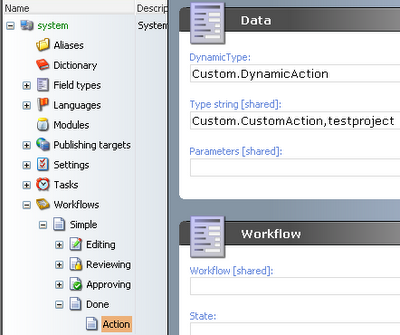
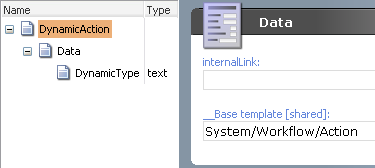
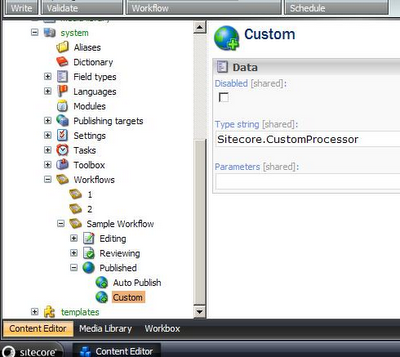
<?xml version="1.0" encoding="utf-8" ?>
<control xmlns:def="Definition" xmlns="http://schemas.sitecore.net/Visual-Studio-Intellisense">
<PreviewCurrentWorkflowPortletdef:inherits="Custom.Portlets.PreviewCurrentWorkflowPortletXmlControl,CurrentWorkflowPortlet">
<Border def:ID="Portlet"><DefaultPortletWindow def:ID="Window" Header="Workflow Details" Icon="Network/16x16/inbox.png">
<Border def:ID="Body"/><Literal def:ID="Workflow" Text="Workflow: " />
<br /><Literal def:ID="WorkflowState" Text="Workflow State" />
</DefaultPortletWindow></Border>
</PreviewCurrentWorkflowPortlet></control>
6. Create a class that will stand for this XML control. Compile it and place into the bin folder. using System; using Sitecore; using Sitecore.Data.Items; using Sitecore.Web.UI.XmlControls; using Sitecore.Web.UI.HtmlControls; namespace Custom.Portlets { public class PreviewCurrentWorkflowPortletXmlControl : XmlControl { protected Border Body; protected Border Portlet; protected XmlControl Window; protected Literal WorkflowState; protected Literal Workflow; protected override void OnLoad(EventArgs e) { base.OnLoad(e); if (!Sitecore.Context.ClientPage.IsEvent) { this.Window.ID = this.ID + "_window"; this.Portlet.Attributes["id"] = this.ID; Item item = UIUtil.GetItemFromQueryString(Sitecore.Context.ContentDatabase); string workflowID = item.Fields["__Workflow"].Value; string stateName = "none"; string workflowName = "none"; if(workflowID != "") { stateName = GetState(item, Sitecore.Context.Database, workflowID).DisplayName; workflowName = Sitecore.Context.Database.Items[new Sitecore.Data.ID(workflowID)].Name; } this.WorkflowState.Text += stateName; this.Workflow.Text += workflowName; } } private Sitecore.Workflows.WorkflowState GetState(Sitecore.Data.Items.Item item, Sitecore.Data.Database database, string workflowID) { // getting the workflow provider for the master database Sitecore.Workflows.IWorkflowProvider provider = database.WorkflowProvider; // getting the Simple workflow through the IWorkflow interface Sitecore.Workflows.IWorkflow iWorkflow = provider.GetWorkflow(workflowID); return iWorkflow.GetState(item); } } } 7. Add the reference to this dll into the web.config (UI » References section):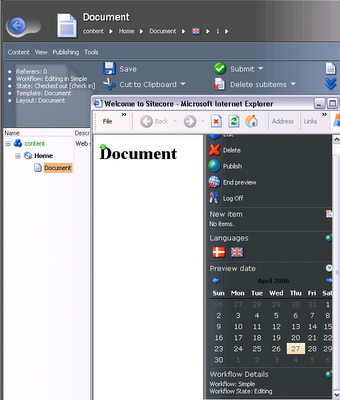
 If you want to have a custom lookup field populated with the ISO field values instead of the item’s name, the following steps should be completed:
Add the custom lookup field named List to e.g. Document template:
 Extend the Template field template by adding a field named Field Name which will define the name of the field to fill into the lookup dropdown list:
 Fill the newly created field with the ISO value – name of the field to retrieve the values from:
 Now you have to customize the source code of your custom lookup field.
Here is the full source code of the custom lookup field. The instructions about how to add a custom field to Sitecore shell can be found here:
http://sdn5.sitecore.net/Articles/API/
Creating%20a%20Composite%20Custom%20Field/
Adding%20a%20Custom%20Field%20to%20Sitecore%20Client.aspx
using System;
using System.Text;
using Sitecore;
using Sitecore.Data;
using Sitecore.Data.Items;
using Sitecore.Shell.Applications.ContentEditor;
using Sitecore.Web.UI.Sheer;
using Sitecore.Web.UI.HtmlControls;
using Sitecore.Web.UI.HtmlControls.Data;
namespace Sitecore.Shell.Applications.ContentEditor
{
public class CustomLookup : Lookup
{
protected override void OnLoad(EventArgs args)
{
if (!Sitecore.Context.ClientPage.IsEvent)
{
Item contextItem = Sitecore.Context.ContentDatabase.Items[this.ItemID];
foreach(TemplateFieldItem tfItem in contextItem.Template.OwnFields)
{
if(tfItem.Source == this.Source)
{
FieldName = tfItem.InnerItem.Fields["Field Name"].Value;
}
}
}
base.OnLoad(args);
}
}
}
Here we have overridden the OnLoad method with the code that sets the FieldName property to the value of the field.
There are some tricks made here since we do not know the name of the current field (List in our case), we had to iterate thorough the template’s own field of the context item and check the Source property. If the sources match, the FieldName property is set to the value of the template field (ISO in our case).
The result of the actions above are depicted below:

 2. Fill the fields as it is shown above.
3. Find the XML control that stands for the Broken Link dialog. It can be found here:
\sitecore\shell\Applications\Tools\Broken links\Broken links.xml
4. Substitute the code beside definition with your custom class as it is shown below:
<CodeBeside Type="Custom.CustomBrokenLinksForm,BrokenLinksForm"/>
where Custom.CustomBrokenLinksForm is the full class name with namespace,
BrokenLinksForm is the name of the assembly.
5. Create and compile the following sample code into the bin directory.
This class outputs the broken link results into the log file. You can implement your own logic here to export it to any file.
using System;
using Sitecore;
using Sitecore.Jobs;
using Sitecore.Links;
using Sitecore.Web.UI.Sheer;
using Sitecore.Resources;
using Sitecore.Diagnostics;
namespace Custom
{
public class CustomBrokenLinksForm : Sitecore.Shell.Applications.Tools.BrokenLinks.BrokenLinksForm
{
[HandleMessage("brokenlinks:export")]
protected void Export(Message message)
{
Context.ClientPage.ClientResponse.Timer("StartExport", 10);
}
public void StartExport()
{
Context.ClientPage.ServerProperties["handle"] = LinkDatabaseProxy.GetBrokenLinks(Context.ContentDatabase).ToString();
CheckExportStatus();
}
protected void CheckExportStatus()
{
Handle handle = Handle.Parse(Context.ClientPage.ServerProperties["handle"] as string);
JobStatus status = LinkDatabaseProxy.GetStatus(handle);
if (status.Failed)
{
Sitecore.Context.ClientPage.ClientResponse.ShowError("An error occured.", StringUtil.StringCollectionToString(status.Messages));
}
else if (status.State == JobState.Finished)
{
ExportReport(status);
}
else
{
Context.ClientPage.ClientResponse.SetInnerHtml("Report", "
2. Fill the fields as it is shown above.
3. Find the XML control that stands for the Broken Link dialog. It can be found here:
\sitecore\shell\Applications\Tools\Broken links\Broken links.xml
4. Substitute the code beside definition with your custom class as it is shown below:
<CodeBeside Type="Custom.CustomBrokenLinksForm,BrokenLinksForm"/>
where Custom.CustomBrokenLinksForm is the full class name with namespace,
BrokenLinksForm is the name of the assembly.
5. Create and compile the following sample code into the bin directory.
This class outputs the broken link results into the log file. You can implement your own logic here to export it to any file.
using System;
using Sitecore;
using Sitecore.Jobs;
using Sitecore.Links;
using Sitecore.Web.UI.Sheer;
using Sitecore.Resources;
using Sitecore.Diagnostics;
namespace Custom
{
public class CustomBrokenLinksForm : Sitecore.Shell.Applications.Tools.BrokenLinks.BrokenLinksForm
{
[HandleMessage("brokenlinks:export")]
protected void Export(Message message)
{
Context.ClientPage.ClientResponse.Timer("StartExport", 10);
}
public void StartExport()
{
Context.ClientPage.ServerProperties["handle"] = LinkDatabaseProxy.GetBrokenLinks(Context.ContentDatabase).ToString();
CheckExportStatus();
}
protected void CheckExportStatus()
{
Handle handle = Handle.Parse(Context.ClientPage.ServerProperties["handle"] as string);
JobStatus status = LinkDatabaseProxy.GetStatus(handle);
if (status.Failed)
{
Sitecore.Context.ClientPage.ClientResponse.ShowError("An error occured.", StringUtil.StringCollectionToString(status.Messages));
}
else if (status.State == JobState.Finished)
{
ExportReport(status);
}
else
{
Context.ClientPage.ClientResponse.SetInnerHtml("Report", "| " + Images.GetImage("Applications/48x48/exchange.png", 0x30, 0x30) + " Processed: " + status.Processed.ToString() + " |
 Visual Studio creates solution and project only in subfolder now: /Test5203/Test5203/
2. Close project
3. Move project files (*.csproj.user and *.csproj, Properties folder) to the Sitecore distributive root
4. Open the project (*.csproj file ) from the Sitecore distributive root.
5. Exclude the default.aspx page from the project.
Now you can add necessary assemblies, include some layouts and sublayouts in project as it was before:
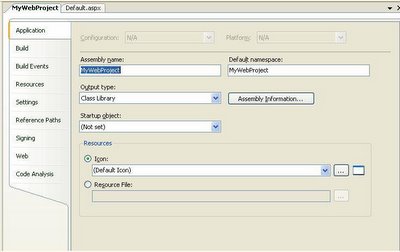
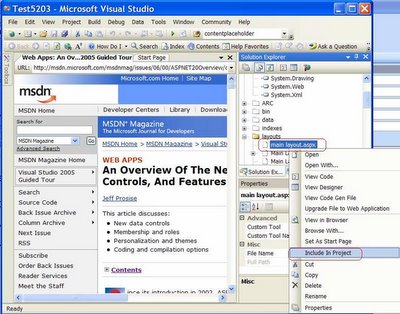 5. Make sure that Project Properties -> Ouput Type is Class Library like it is shown here.
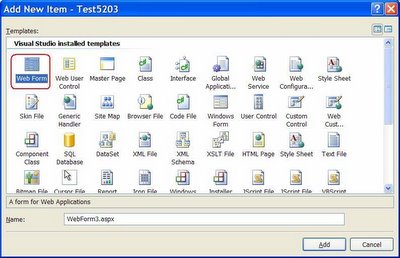
 6. In order to work with code behind class you should resort to some trick.
 Please note that the Firebird server is not required to be installed on the web server at all.
If restarting IIS doesn’t help in your case, I suggest you to ensure that the following security permissions are set for the Firebird databases.
• ASPNET for XP or NETWORK SERVICE for 2003 Server – full control on the dist folder
• IUSR – full control on the dist folder
In addition, grant write rights for the data folder in IIS.
Make appropriate security changes and reset the IIS.