Wednesday, February 13, 2008

Storing Flash Video files in Sitecore media library


You can certainly do this as many other things, but there is a little bit of a problem here. Since all media stored within Sitecore has a media request handler assigned to it, the actual URL of the media item will have the "ASHX" extension.

The flash video component expects only MP3 and FLV extensions as a source, so "ASHX" will not be processed.

In order to have this working, follow this article for the directions and configure the FLV extension accordingly.

Power of Sitecore: Separation of UI and Data Layers Continued


This is a continuation to the previous blog post about one of the most powerful features of the product.

You can develop a notion of themes in Sitecore very easily. This will allow you as a Sitecore solution developer and architect to create a list of predefined themes for further usage.

Since it is a common best practice to store any meta data or system information that is not relevant to the site content itself in a global section, consider creating a special data template for your custom themes with the following fields:

Layout - any lookup field (I used treelist in this example for good demo purposes) data source is set to /sitecore/layout/layouts. Used for picking up a layout for a theme.

CSS - a field of type "lookup" pointing to a media folder storing all the CSS files.
FavIcon - a field of type "lookup" pointing to a media folder storing all the favorite icon files.

Here is how this can look like:
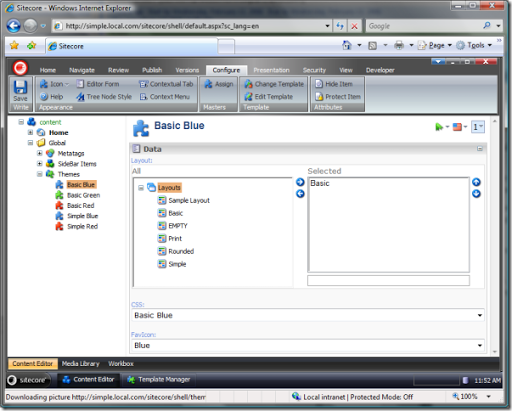
theme

Our second step will be to extent the content template used for the home page of the website to include a reference to a theme. The idea here is to have a single selection of a theme on the home item. After this, dynamic layout replacement logic will be able to locate the selected theme on the home item and perform layout substitution, as well as CSS and favicon processing. By simply extending the home item template, I have added a tree list field (just for the sake of good demonstration) and pointed it to the "themes" folder:
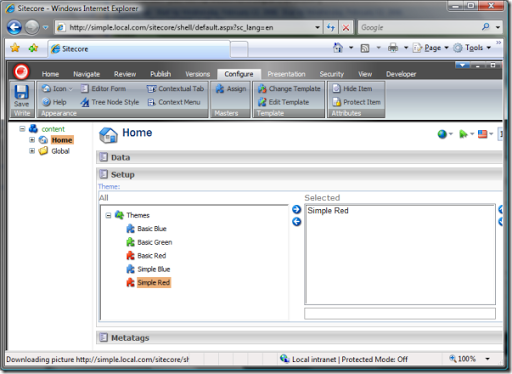
theme_selection

Next step is to create a dummy empty layout that will be used by the dynamic layout replacement logic. It is pretty simple, any aspx layout will do for that. Here is how it can look:
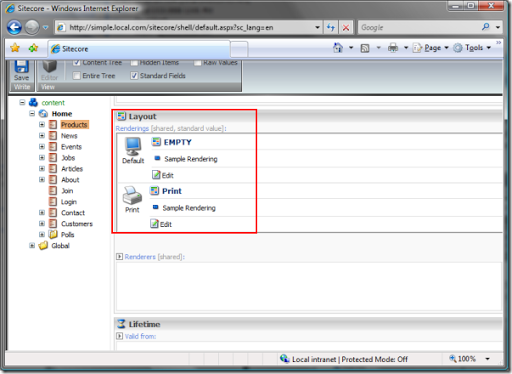
empty_layout

Notice that you can use it the same way as you used to - assign renderings and sublayouts to placeholders, etc. Again, the GUID of this empty dummy layout will be used the dynamic layout replacement logic which is basically another custom LayoutResolver added after the default one in the httpRequestBegin pipeline:

<processor type="Sitecore.Pipelines.HttpRequest.LayoutResolver, Sitecore.Kernel" />
<processor type="SCUSAINC.SimpleDemoSite.Customizations.Pipelines.LayoutResolver, SCUSAINC.SimpleDemoSite"/>

The logic of this processor is pretty straightforward - replace the EMPTY layout with the one defined in the selected theme.

Here you go - you now can change the overall look and feel of the website with one click! And that's thanks to the dynamic presentation engine and data/UI separation in Sitecore.

Code attached:

using Sitecore;
using Sitecore.Pipelines.HttpRequest;
using Sitecore.Data;
using Sitecore.Data.Items;
using Sitecore.Data.Fields;

namespace SCUSAINC.SimpleDemoSite.Customizations.Pipelines
{
   public class LayoutResolver
   {
      public void Process(HttpRequestArgs args)
      {
         if ((Context.Item != null) && (Sitecore.Context.Database != null))
         {
            LayoutItem layout = Context.Item.Visualization.Layout;
            // check if the layout ID equals to the "EMPTY Layout ID"
            if (layout != null && layout.InnerItem.ID == ID.Parse("{A7DF692D-AA72-4D1F-96D7-6F27B2326DDB}"))
            {
               Item homeItem = Sitecore.Context.Database.Items[Sitecore.Context.Site.StartPath];

               if (homeItem != null)
               {
                  if (homeItem.Fields["theme"] != null && homeItem["theme"] != string.Empty)
                  {
                     if (homeItem.Fields["theme"].Type == "tree list")
                     {
                        MultilistField themeField = homeItem.Fields["theme"];

                        ID themeID = ID.Null;

                        if (ID.TryParse(themeField.Items[0], out themeID))
                        {
                           Item themeItem = Sitecore.Context.Database.GetItem(themeID);

                           if (themeItem != null && themeItem.Fields["layout"] != null && themeItem["layout"] != string.Empty)
                           {
                              if (themeItem.Fields["layout"].Type == "tree list")
                              {
                                 MultilistField layoutField = themeItem.Fields["layout"];

                                 ID layoutID = ID.Null;

                                 if (ID.TryParse(layoutField.Items[0], out layoutID))
                                 {
                                    Item layoutItem = Sitecore.Context.Database.GetItem(layoutID);

                                    Context.Page.FilePath = layoutItem["path"];
                                 }
                              }
                           }
                        }
                     }
                  }
               }
            }
         }
      }
   }
}

Wednesday, January 30, 2008

Dev Layout Chunk


When developing new web sites or demos with Sitecore, especially during the phase of building the presentation layer, I often have to switch to the Standard Fields and Raw Values to copy and paste layout definition from one item to another or from a template's standard values to another item. Also, sometimes I have to reset the layout field value to restore the inheritance from the standard values. This kind of operation takes at least 5 clicks, that's why I have created a "Dev Layout" chunk allowing you to do the following operations with one click:

  • Copy the presentation logic of the current item to the clipboard
  • Paste the presentation logic from the clipboard to the current item
  • Reset the layout field (set the value of the "Renderings" field to null which opens up field inheritance from standard values)
    • available for all the children of the selected item
  • Empty the layout field (set the value of the "Renderings" field to empty string which blocks the field inheritance from standard values BUT allows inheritance from the template itself)
    • available for all the children of the selected item

This is how it looks:

dev_layout

Here are the links:

Disclaimer:

This solution is provided AS IS, with no guarantee, and stuff. Sitecore is not responsible for supporting this extension which is considered as a product customization which means that this solution may not be working on next major releases while was developed on 5.3.1 build 071114.

Please do not deploy on the production servers as it was intended for developer use on designated dev boxes. Please use responsibly ;-)

Friday, December 14, 2007

Power of Sitecore: Separation of UI and Data Layers


There is a simple approach on how you can accomplish user driven site design by letting them select different CSS files or skins.

What I did is put an XSLT rendering into the head section of the layout that will be reused across the pages:

<head>

<title>Some title</title>

<sc:XslFile ID="styleSelector" Path="/xsl/styleselector.xslt" runat="server" />

</head>

The source of the xslt rendering is looking for the “css” field of the “home” item which is a lookup pointing to the media library:

<!-- getting the id of the selected css asset -->

<xsl:variable name="cssAssetID" select="sc:fld('css',$home)"/>

<!-- getting the actual path of the css asset -->

<xsl:variable name="cssAssetPath" select="sc:fld('path',sc:item($cssAssetID,.))"/>

<!-- building the CSS link tag -->

<link href="{$cssAssetPath}" rel="stylesheet" type="text/css" />

The logic eventually outputs the link tag with the CSS file reference.

The “css” field is just a lookup field pointing to the media library repository with already uploaded CSS files and looks like:

css_field

The result of different selections is shown below.

For the “Basic Blue” selection:

blue_layout

For the “Basic Red” selection:

red_layout

WebEdit content markers


This is pretty simple, but still worth mentioning.

In order to add the green content markers to your page in XSLT, use this approach.

As for .NET, you have a number of options:

This will create the content marker that points to the context item: <sc:ContentDot id="contentDot" runat="server" />

This will create the content marker that points to the “news” item: <sc:ContentDot id="contentDot" DataSource="/sitecore/content/home/news" runat="server" />

This will create the content marker that points to the item with the specified ID: <sc:ContentDot id="contentDot" DataSource="{687BF9D7-9968-4EDF-863E-0A2611DDD51B}" runat="server" />

If you are constructing the controls dynamically, here is the solution.