This applies to Sitecore 5.3.
The problem.
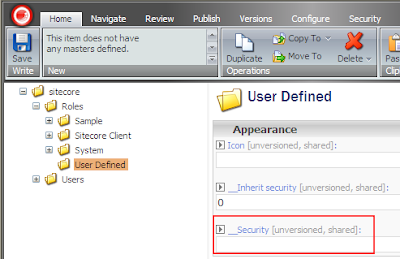
As you may know, by default it is not possible to restrict access to certain security items in the security or extranet databases. You can check it by going to the security or extranet database and trying to set permissions in the Security Editor, the application just won't let you deny access to a specific item. The reason is that these items do not have the necessary system field named "__Security" that stores the security assignments.
The background.
There could be a requirement for certain users to see only a subset of users and roles. For example, Biology department should not manage users from another departments.
The solution.
So the first step to make it happen is to modify the security templates to include the field which will be storing the security definitions. This file is stored under "/sitecore/shell/" and it is called "security templates.xml" and the purpose of this file is to define the data structure of the security templates which are created on the fly using these XML definitions.
The following field definition should be added to the Folder, Role and User templates. The section you are adding to is not important but it is preferred to add the fields to the Data section (create it if it is not there yet).
<field
id="{DEC8D2D5-E3CF-48B6-A653-8E69E2716641}" name="__Security" icon="" shared="1" sortorder="" source="" style="" type="text" unversioned="1" />
The attributes in bold are important. The id attribute should be set to the "__Security" field ID and the name is important as well.
After this change, IIS restart and browser reopen is required. You should see the following picture in the Content Editor when browsing the security and extranet databases:
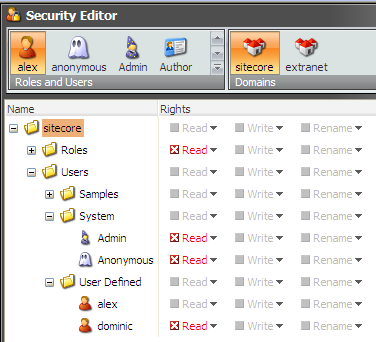
This means that now you can deny read access in the security or extranet databases:
It is not all that you should do though, because the User Manager won't just respect this security settings. So the second step is to override this application. It is fairly simple:
1. Copy the XML control source file named Security manager.xml from "\sitecore\shell\Applications\Security\Security manager\" to "\sitecore\shell\override".
2. Don't forget about this when upgrading :-)
3. Compile the following code for this form and place the assembly to the
bin folder. Here is the source:
using System;
using System.Data;
using System.Configuration;
using System.Web;
using System.Web.Security;
using System.Web.UI;
using System.Web.UI.WebControls;
using System.Web.UI.HtmlControls;
using System.Collections;
using Sitecore;
using Sitecore.Data;
using Sitecore.Data.Items;
using Sitecore.SecurityModel;
using Sitecore.Configuration;
using Sitecore.Web.UI.HtmlControls;
namespace WiseBusiness.Shell.Security
{
public class CustomSecurityManagerForm :
Sitecore.Shell.Applications.Security.SecurityManager.SecurityManagerForm
{
private ArrayList deniedItems = new ArrayList();
protected override void OnLoad(EventArgs e)
{
base.OnLoad(e);
if (!Sitecore.Context.ClientPage.IsEvent)
{
// we should respect administrators
if (!Sitecore.Context.User.IsAdministrator)
{
// fill the array list of item the current user does not have access to
GetDeniedItems();
string deniedItemIDs = ArrayListToString(deniedItems, ",");
if (deniedItemIDs != string.Empty)
{
// setting the data context excluding items that the current item does not have access to
this.FilteredDataContext.Filter = "not(Contains('" + deniedItemIDs + "', @@id))";
this.DataContext.Filter = "not(Contains('" + deniedItemIDs + "', @@id))";
}
}
}
}
private string ArrayListToString(System.Collections.ArrayList ar, string delim)
{
return string.Join(delim, (string[])ar.ToArray(typeof(string)));
}
private void GetDeniedItems()
{
// getting the selected domain
Database database = Factory.GetDomain(this.Domain).Database;
if (database != null)
{
// checking security recursively
ProcessItem(database.GetRootItem());
}
}
private void ProcessItem(Item parent)
{
foreach (Item child in parent.Children)
{
using (new SecurityDisabler())
{
// check if the context user cannot read the current item
if (child.SecurityField.GetRights(Sitecore.Context.User, true) == ItemRights.DenyRead)
{
deniedItems.Add(child.ID.ToString());
}
}
ProcessItem(child);
}
}
}
}
The comments in the code should help to understand the concept. If not, shoot me a message.
The key things:
- Inheriting from the existing User Manager form.
- Calling the base OnLoad method thanks to the power of inheritance.
- Modifying the FilteredDataContext's and DataContext's filters to exclude security items that the current user does not have access to.
4. Make the following change in the XML control source file to reference the newly compiled class (as usual):
<CodeBeside type="WiseBusiness.Shell.Security.CustomSecurityManagerForm,WiseBusiness" />
Here is the resulting picture in the User Manager for the user:
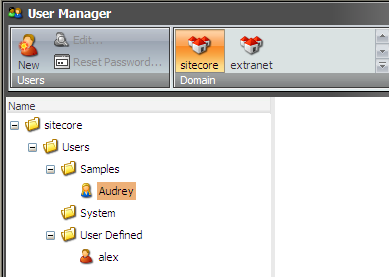
As can be seen, this user cannot see the roles container, system users and user named dominic.
Of course, the code might be far from perfect but I am open to suggestions!
Update: this will be addressed in next major release.
 This means that now you can deny read access in the security or extranet databases:
 It is not all that you should do though, because the User Manager won't just respect this security settings. So the second step is to override this application. It is fairly simple:
1. Copy the XML control source file named Security manager.xml from "\sitecore\shell\Applications\Security\Security manager\" to "\sitecore\shell\override".
2. Don't forget about this when upgrading :-)
3. Compile the following code for this form and place the assembly to the bin folder. Here is the source:
using System;
using System.Data;
using System.Configuration;
using System.Web;
using System.Web.Security;
using System.Web.UI;
using System.Web.UI.WebControls;
using System.Web.UI.HtmlControls;
using System.Collections;
using Sitecore;
using Sitecore.Data;
using Sitecore.Data.Items;
using Sitecore.SecurityModel;
using Sitecore.Configuration;
using Sitecore.Web.UI.HtmlControls;
namespace WiseBusiness.Shell.Security
{
public class CustomSecurityManagerForm : Sitecore.Shell.Applications.Security.SecurityManager.SecurityManagerForm
{
private ArrayList deniedItems = new ArrayList();
protected override void OnLoad(EventArgs e)
{
base.OnLoad(e);
if (!Sitecore.Context.ClientPage.IsEvent)
{
// we should respect administrators
if (!Sitecore.Context.User.IsAdministrator)
{
// fill the array list of item the current user does not have access to
GetDeniedItems();
string deniedItemIDs = ArrayListToString(deniedItems, ",");
if (deniedItemIDs != string.Empty)
{
// setting the data context excluding items that the current item does not have access to
this.FilteredDataContext.Filter = "not(Contains('" + deniedItemIDs + "', @@id))";
this.DataContext.Filter = "not(Contains('" + deniedItemIDs + "', @@id))";
}
}
}
}
private string ArrayListToString(System.Collections.ArrayList ar, string delim)
{
return string.Join(delim, (string[])ar.ToArray(typeof(string)));
}
private void GetDeniedItems()
{
// getting the selected domain
Database database = Factory.GetDomain(this.Domain).Database;
if (database != null)
{
// checking security recursively
ProcessItem(database.GetRootItem());
}
}
private void ProcessItem(Item parent)
{
foreach (Item child in parent.Children)
{
using (new SecurityDisabler())
{
// check if the context user cannot read the current item
if (child.SecurityField.GetRights(Sitecore.Context.User, true) == ItemRights.DenyRead)
{
deniedItems.Add(child.ID.ToString());
}
}
ProcessItem(child);
}
}
}
}
The comments in the code should help to understand the concept. If not, shoot me a message.
The key things:
- Inheriting from the existing User Manager form.
- Calling the base OnLoad method thanks to the power of inheritance.
- Modifying the FilteredDataContext's and DataContext's filters to exclude security items that the current user does not have access to.
4. Make the following change in the XML control source file to reference the newly compiled class (as usual):
<CodeBeside type="WiseBusiness.Shell.Security.CustomSecurityManagerForm,WiseBusiness" />
Here is the resulting picture in the User Manager for the user:
It is not all that you should do though, because the User Manager won't just respect this security settings. So the second step is to override this application. It is fairly simple:
1. Copy the XML control source file named Security manager.xml from "\sitecore\shell\Applications\Security\Security manager\" to "\sitecore\shell\override".
2. Don't forget about this when upgrading :-)
3. Compile the following code for this form and place the assembly to the bin folder. Here is the source:
using System;
using System.Data;
using System.Configuration;
using System.Web;
using System.Web.Security;
using System.Web.UI;
using System.Web.UI.WebControls;
using System.Web.UI.HtmlControls;
using System.Collections;
using Sitecore;
using Sitecore.Data;
using Sitecore.Data.Items;
using Sitecore.SecurityModel;
using Sitecore.Configuration;
using Sitecore.Web.UI.HtmlControls;
namespace WiseBusiness.Shell.Security
{
public class CustomSecurityManagerForm : Sitecore.Shell.Applications.Security.SecurityManager.SecurityManagerForm
{
private ArrayList deniedItems = new ArrayList();
protected override void OnLoad(EventArgs e)
{
base.OnLoad(e);
if (!Sitecore.Context.ClientPage.IsEvent)
{
// we should respect administrators
if (!Sitecore.Context.User.IsAdministrator)
{
// fill the array list of item the current user does not have access to
GetDeniedItems();
string deniedItemIDs = ArrayListToString(deniedItems, ",");
if (deniedItemIDs != string.Empty)
{
// setting the data context excluding items that the current item does not have access to
this.FilteredDataContext.Filter = "not(Contains('" + deniedItemIDs + "', @@id))";
this.DataContext.Filter = "not(Contains('" + deniedItemIDs + "', @@id))";
}
}
}
}
private string ArrayListToString(System.Collections.ArrayList ar, string delim)
{
return string.Join(delim, (string[])ar.ToArray(typeof(string)));
}
private void GetDeniedItems()
{
// getting the selected domain
Database database = Factory.GetDomain(this.Domain).Database;
if (database != null)
{
// checking security recursively
ProcessItem(database.GetRootItem());
}
}
private void ProcessItem(Item parent)
{
foreach (Item child in parent.Children)
{
using (new SecurityDisabler())
{
// check if the context user cannot read the current item
if (child.SecurityField.GetRights(Sitecore.Context.User, true) == ItemRights.DenyRead)
{
deniedItems.Add(child.ID.ToString());
}
}
ProcessItem(child);
}
}
}
}
The comments in the code should help to understand the concept. If not, shoot me a message.
The key things:
- Inheriting from the existing User Manager form.
- Calling the base OnLoad method thanks to the power of inheritance.
- Modifying the FilteredDataContext's and DataContext's filters to exclude security items that the current user does not have access to.
4. Make the following change in the XML control source file to reference the newly compiled class (as usual):
<CodeBeside type="WiseBusiness.Shell.Security.CustomSecurityManagerForm,WiseBusiness" />
Here is the resulting picture in the User Manager for the user:
 As can be seen, this user cannot see the roles container, system users and user named dominic.
Of course, the code might be far from perfect but I am open to suggestions!
Update: this will be addressed in next major release.
As can be seen, this user cannot see the roles container, system users and user named dominic.
Of course, the code might be far from perfect but I am open to suggestions!
Update: this will be addressed in next major release.