Too many times I’ve seen this question, it is not even funny. My images are not showing up when I publish an item. While it can easily be explained from the technical perspective and addressed, it does not always make sense from user’s point of view.
Today I’ve learnt that Sitecore 6.2 actually introduced a small feature, an additional processor for the publishItem pipeline, intended to process related media items linked from the FileDropArea field, which was also another addition in 6.2.
Showing posts with label workflows. Show all posts
Showing posts with label workflows. Show all posts
Wednesday, July 21, 2010
Thursday, March 11, 2010
Publish to pre-production web database
Update 3/11/2010: Correction » the last parameter of the ExtendedPublishOptions constructor should be “false”. Please see below for details.
In my experience with enterprise level implementations, there is often a need for a separate “stage environment” for final content preview or a pre-production phase of workflow.
It is also often the case that the environmental limitations or restrictions make the content delivery part of the authoring environment suitable for such purpose. For example, your e-commerce infrastructure could not be available from the authoring instance. One of the possible ways to approach such a requirement is to configure a stand-alone staging instance of Sitecore which will be used for content delivery instance and is commonly configured exactly like one of the servers in the web farm. There is one exception though – the database that is used for content delivery is generally different from the one that is used in production content delivery.
With this approach, now the question is how to plug in workflow in a way that content could go via this “stage” environment and then only upon final approval will be able to get to “production”.
Now there is a problem that you cannot get get items published until they are in final workflow state. You could have two workflow states “Staged” and “Published”, both marked as final and with auto publish actions connected.
I don’t like this approach since it goes against the workflow nature – only one state should be marked as final.
Alternatively, you can plug in a “copy item” workflow action to the “Staged” workflow state where you can programmatically copy an item from master database to stage web.
While this approach does seem legitimate, it works around the need of publishing thus any additional processing you may be having in publish(item) pipeline would not work.
I looked into the option of having publishing process ignore workflow when publishing to stage. While this seemed like a dangerous path to go, I have soon discovered that the PublishHelper’s GetVersionToPublish method already accepts this notion of passing a “requireapproval” flag to the underlying publishing mechanism. Since it is always passes “true”, I started looking into ways to make this flag dynamic and figured that setting it on the level of PublishOptions could be a good idea. For example, from the code of my workflow action I would be able to define whether I want to have workflow respected or not.
Here is what you will need to do to make it work.
First, override the default PipelinePublishProvider and plug it into the web.config:
<publishManager defaultProvider="default" enabled="true">
    <providers>
        <clear />
         <!--<add name="default" type="Sitecore.Publishing.PipelinePublishProvider, Sitecore.Kernel" />-->
         <add name="default" type="SCUSAINC.Publishing.ExtendedPublishProvider, SCUSAINC.Publishing" />
     </providers>
</publishManager>
Secondly, you will need to override the CreatePublishHelper class:
public class ExtendedPublishProvider : PipelinePublishProvider
    {
        public override PublishHelper CreatePublishHelper(PublishOptions options)
        {
            Assert.ArgumentNotNull(options, "options");
            if (options is ExtendedPublishOptions)
                return new ExtendedPublishHelper(options as ExtendedPublishOptions);

            return new PublishHelper(options);
        }
    }
After that, introduce two more classes – ExtendedPublishHelper and ExtendedPublishOptions:
public class ExtendedPublishHelper : PublishHelper
    {
        private readonly ExtendedPublishOptions _options;

        public ExtendedPublishHelper(ExtendedPublishOptions options)
            : base(options)
        {
            _options = options;
        }

        public override Item GetVersionToPublish(Item sourceItem)
        {
            Assert.ArgumentNotNull(sourceItem, "sourceItem");
            if (Options is ExtendedPublishOptions)
            {
                return sourceItem.Publishing.GetValidVersion(Options.PublishDate, _options.RequireApproval);
            }

            return sourceItem.Publishing.GetValidVersion(Options.PublishDate, true);
        }
    }

public class ExtendedPublishOptions : PublishOptions
    {
        public ExtendedPublishOptions(Database sourceDatabase, Database targetDatabase, PublishMode mode, Language language, DateTime publishDate, bool requireApproval)
            : base(sourceDatabase, targetDatabase, mode, language, publishDate)
        {
            RequireApproval = requireApproval;
        }

        public bool RequireApproval { get; set; }
    }
Now you are ready to launch publishing with workflow settings completely ignored. For example, this is how you can do it from the workflow action:
var database = Factory.GetDatabase(databaseName);

var options = new ExtendedPublishOptions(dataItem.Database, database, PublishMode.SingleItem, dataItem.Language, DateTime.Now, false)
{
         RootItem = dataItem,
         Deep = true;
};

new Publisher(options).PublishAsync();
3/11/2010: Correction » the last parameter of the ExtendedPublishOptions constructor should be “false”.
Instead of hardcoding it, I’d suggest having a parameter on the level of a workflow action which you can read and pass on.
private static bool RequireApproval(string parameters)
{
         return WebUtil.ParseUrlParameters(parameters)["RequireApproval"] == "true";
 }
public void Process(WorkflowPipelineArgs args)
{
                ...
               var requireApproval = RequireApproval(innerItem["parameters"]);
               var options = new ExtendedPublishOptions(dataItem.Database, database, PublishMode.SingleItem, dataItem.Language, DateTime.Now, requireApproval)

                ...

 }
That’s it!
Tested on Sitecore 6.1. Expected to work with 6.2.
Thursday, December 18, 2008
Who moved the item to the workflow state?
Applies to Sitecore 6.0.
In the workflow scenarios with "rejection" commands when an item is moved to a previous workflow state, sometimes necessary to notify the user who submitted the item in the first place.
Since Sitecore keeps track of workflow activities and writes everything into WorkflowHistory table, there are also APIs to retrieve such information.
The code snippet below shows how it can be done.
protected override string GetRecipient(WorkflowPipelineArgs args)
{
IWorkflowProvider workflowProvider = Context.ContentDatabase.WorkflowProvider;
if (workflowProvider != null)
{
IWorkflow workflow = workflowProvider.GetWorkflow(args.DataItem[FieldIDs.Workflow]);
if (workflow != null)
{
WorkflowEvent[] history = workflow.GetHistory(args.DataItem);
if (history.Length > 0)
{
WorkflowEvent wfEvent = history[history.Length - 1];
string fullUserName = wfEvent.User;
if (User.Exists(fullUserName))
{
System.Web.Security.MembershipUser mUser = Membership.GetUser(fullUserName);
if (mUser.Email != string.Empty)
{
return mUser.Email;
}
}
}
}
}
return string.Empty;
}
This method can be a part of workflow email action that is associated with the "Reject" command.
Related links:
Don't you just love Sitecore workflow?
Sunday, August 17, 2008
Department Based Workflow
This applies to version 5.3.x but also can be used with the latest Sitecore 6. Imagine a scenario when you have a multisite or a department-based content tree with micro-sites or department sections sharing the same data template definitions. For example, we have the “Articles” section defined in the both “US” and “France” micro-sites. The articles as items have the same set of fields, in other words, these items are created from the same data template. Also, there is an absolute requirement is to have different workflows assigned to different instances of the articles. For example, for the articles created inside of the “France” micro-site, the workflow will consist of three states and have a unique set of workflow actions and possibly different security. For the “US” articles, the whole workflow configuration will be different.
Wednesday, October 17, 2007
Publish related media items
Often users are curious why when they publish articles, the media associated with this article was not published.
There is one simple explanation - media items/assets in Sitecore are considered as separate content items and should be published separately.
Thanks to the powerful Sitecore Workflow engine that can be easily extended using workflow actions, it is possible to publish related media items by means of a special workflow action.
So by simply adding a workflow action before the Auto Publish action with the logic below, you will ensure that the relations will be published before the actual item:

The code of the workflow action:
using System;
using Sitecore;
using Sitecore.Configuration;
using Sitecore.Data.Items;
using Sitecore.Links;
using Sitecore.Publishing;
using Sitecore.Workflows.Simple;
namespace WebApp.Customizations
{
public class PublishRelationsAction
{
public void Process(WorkflowPipelineArgs args)
{
Item dataItem = args.DataItem;
// Find all related items
ItemLink[] itemLinks = dataItem.Links.GetValidLinks();
foreach (ItemLink link in itemLinks)
{
Item itm = link.GetTargetItem();
// publishing related media items - the ones that were referenced by the workflow item
// this can be extended - you can publish related aliases also
if (itm != null && itm.Paths.IsMediaItem)
{
PublishItem(itm);
}
}
}
private void PublishItem(Item item)
{
PublishOptions options = new PublishOptions(PublishMode.SingleItem, item.Language, DateTime.Now);
options.RootItem = item;
options.Deep = false;
options.SourceDatabase = item.Database;
// publishing to the web database
// production scenarios may have different publishing targets
// this can be handled by some more advanced logic,
// for example retrieving parameterized targets from the workflow action
options.TargetDatabase = Factory.GetDatabase("web");
new Publisher(options).Publish();
}
}
}
Related reading:
- http://sdn5.sitecore.net/Resources/Shared%20Source/Workflow/Workflow%20Actions.aspx
- http://sdn5.sitecore.net/Resources/Shared%20Source/Workflow.aspx
- http://sdn5.sitecore.net/FAQ/Workflow/Workflow%20State%20Action.aspx
- http://sdn5.sitecore.net/FAQ/API/Cause%20the%20workflow%20to%20invoke%20an%20action.aspx
The caveats:
- If media items are associated with another workflow, they should be in the final state.
- Obviously this solution works when you are using workflow. Other solutions such as handing of publish:end events does not seem to be as easy as workflow action. In this case it could be better to introduce a one step workflow with one initial state "Editing" and final "Published" with such action attached.
Thanks to Alexander Tsvirchkov for investigation and code and Kim Hornung for ideas.
Thursday, November 30, 2006
Workflow with unpublishing
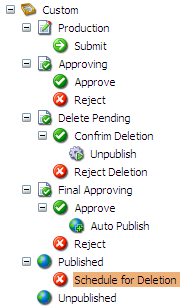 Nothing difficult, but I thought this might be interesting anyway.
 So we need to implement a workflow which provides us with a possibility to schedule item deletion and finally unpublish it from the front end upon confirmation.
The key point is additional workflow state named "Deletion Pending" which is referred by the "Schedule for Deletion" command.It has two commands: "Confirm Deletion" and "Reject Deletion". The first command unpublishes item and the second returns it to the "Published" state.
The "Process" method that is invoked by the "Unpublish" workflow action looks like this:
public void Process(WorkflowPipelineArgs args) { Error.AssertObject(args.DataItem, "args.DataItem"); Item item = args.DataItem;
Database web = Factory.GetDatabase("web"); Database master = Factory.GetDatabase("master");
using (new Sitecore.SecurityModel.SecurityDisabler()) { DeleteItem(web, item); DeleteItem(master, item);
// RemoveLinks(item); LinkManager.UpdateLink(item); }
Sitecore.Context.ClientPage.SendMessage(this, String.Format("item:refresh(id={0})", item.ID)); }
private void DeleteItem(Database db, Item item) { if (db.Items[item.ID] != null) { db.Items[item.ID].Delete(); Log.Info(String.Format("Item {0} was deleted from the {1} database using the workflow command.", item.Paths.FullPath, db), this); } else { Log.Info(String.Format("Deletion for the item {0} failed for the {1} database. Item not found.", item.Paths.FullPath, db), this); } }
I've found two cons so far:
- multiple final states: "Published" and "Unpublished"
- the solution is not a substitute of the "Delete" which may be misleading.
Good luck.
Wednesday, July 12, 2006
Changing a workflow state from API
Changing a workflow state from API
Version: Sitecore 5.1.1.18/5.2.0.9
Include these using directives:
using Sitecore;
using Sitecore.Data;
using Sitecore.Data.Items;
using Sitecore.Workflows;
using Sitecore.Configuration;
using Sitecore.SecurityModel;
Here is the code snippet with appropriate comments:
// getting the master database
Database master = Factory.GetDatabase("master");
// getting a sample item
Item itm = master.Items["/sitecore/content/home/news"];
// getting the item's workflow reference
IWorkflow wf = master.WorkflowProvider.GetWorkflow(itm);
// here we need either to login as a user with appropriate permissions
// to have access to workflow states/commands or disable security
using(new SecurityDisabler())
{
// executing the workflow command by calling the Execute method.
// it receives the ID of the command being invoked,
// the item that is in the workflow.
// Note that the command ID that we passed as the first parameter,
// should be a valid ID of any workflow command under the current workflow state
// that the item belongs to.
WorkflowResult result =
wf.Execute("{0FB92663-F44B-4E24-9CF2-B6D6CE786505}", itm, "my comments", false);
// Retrieving the result of the workflow command execution
Response.Write("Succeeded: " + result.Succeeded + "
Message: " + result.Message);
}
After the code above is succeeded, all actions that are tied to the new workflow state will be executed.
Subscribe to:
Posts (Atom)