You may need to get all items that were processes by a publishing operation for different reasons, for example, pull certain information for each item and notify CDN of a change so cache could be purged. AKAMAI can be configured to behave that way.
Currently we have two articles on the subject. This one describes how to use the PublishEngine, second article suggests approach with custom PublishLog. Both are not compatible with 6.x. So I’ve looked into the options for the latest Sitecore with tech support. Our findings included introduction of a new PublishProcessor which examines the Queue property of PublishContext, but this did not work properly for smart publishing and I wanted a bulletproof yet simple approach applicable to all possible publishing modes.
Then I remembered that we are already doing similar things for indexing. The update index job processes only changed items and gets that information from the History storage.
Showing posts with label api. Show all posts
Showing posts with label api. Show all posts
Monday, December 14, 2009
Saturday, July 18, 2009
Ways to check field type in code
As a “safe check” code operation in Sitecore, you frequently check for expected field type before working with a field.
While there is an easy way to do it via “Type” property of a field returning string, it may not look really nice and considered hard-coding:
if (Sitecore.Context.Item.Fields["featured"].Type == "Droplink")
Plus backwards compatibility of such code is questionable.
I suggest you use the Sitecore.Data.Fields.FieldTypeManager class that has “GetField” method where you can pass the instance of your field and use “IS” keyword to check if it is safe to cast:
if (FieldTypeManager.GetField(Sitecore.Context.Item.Fields["title"]) is TextField)
if (FieldTypeManager.GetField(Sitecore.Context.Item.Fields["text"]) is HtmlField)
if (FieldTypeManager.GetField(Sitecore.Context.Item.Fields["featured"]) is LookupField)
if (FieldTypeManager.GetField(Sitecore.Context.Item.Fields["metakeywords"]) is MultilistField)
Just make sure to replace the field name strings with a reference to a GUID class and you will be all set!
Thursday, December 18, 2008
Who moved the item to the workflow state?
Applies to Sitecore 6.0.
In the workflow scenarios with "rejection" commands when an item is moved to a previous workflow state, sometimes necessary to notify the user who submitted the item in the first place.
Since Sitecore keeps track of workflow activities and writes everything into WorkflowHistory table, there are also APIs to retrieve such information.
The code snippet below shows how it can be done.
protected override string GetRecipient(WorkflowPipelineArgs args)
{
IWorkflowProvider workflowProvider = Context.ContentDatabase.WorkflowProvider;
if (workflowProvider != null)
{
IWorkflow workflow = workflowProvider.GetWorkflow(args.DataItem[FieldIDs.Workflow]);
if (workflow != null)
{
WorkflowEvent[] history = workflow.GetHistory(args.DataItem);
if (history.Length > 0)
{
WorkflowEvent wfEvent = history[history.Length - 1];
string fullUserName = wfEvent.User;
if (User.Exists(fullUserName))
{
System.Web.Security.MembershipUser mUser = Membership.GetUser(fullUserName);
if (mUser.Email != string.Empty)
{
return mUser.Email;
}
}
}
}
}
return string.Empty;
}
This method can be a part of workflow email action that is associated with the "Reject" command.
Related links:
Don't you just love Sitecore workflow?
Thursday, December 04, 2008
How to bring a webform to Sitecore desktop
Applies to both Sitecore 5 and Sitecore 6.
If you need to bring a custom built web form (aspx) to Sitecore's desktop, it is pretty easy to do.
First, you need a webform residing under the root of your web site, for example, /forms/testform.aspx.
Then you need to create a reference to this webform from the core database under /sitecore/content/Applications: 
Just fill out the necessary "Application" field with the relative path to your .aspx (/forms/testform.aspx). Here you can also specify additional parameters such as icon, size of the app, tooltip, etc.
This is the definition of your application.
After this, add a shortcut to the app from either "Bottom", "Left", "Right" or "Programs" menus under /sitecore/content/Documents and settings/All users/Start menu.
In the "Application" field, just put the path to the item containing the definition of your app created previously: 
That's it! Now you can launch your app within Sitecore Desktop:


Now if you want to access Sitecore context objects (Items, Database, Fields, etc.) it is recommended to create a custom site for that purpose and associate it with the folder hosting your custom forms:
<sites>
<site name="shell" virtualFolder="/sitecore/shell" physicalFolder="/sitecore/shell" rootPath="/sitecore/content" startItem="/home" language="en" database="core" domain="sitecore" loginPage="/sitecore/login" content="master" contentStartItem="/Home" enableWorkflow="true" xmlControlPage="/sitecore/shell/default.aspx" browserTitle="Sitecore" htmlCacheSize="2MB" registryCacheSize="3MB" viewStateCacheSize="200KB" xslCacheSize="5MB" />
...
<site name="custom_forms" virtualFolder="/forms" physicalFolder="/forms" rootPath="/sitecore/content" startItem="/home" language="en" database="core" domain="sitecore" content="master" enableWorkflow="true" />
<site name="website" virtualFolder="/" physicalFolder="/" rootPath="/sitecore/content" startItem="/home" database="web" domain="extranet" allowDebug="true" cacheHtml="true" htmlCacheSize="10MB" registryCacheSize="0" viewStateCacheSize="0" xslCacheSize="5MB" filteredItemsCacheSize="2MB" enablePreview="true" enableWebEdit="true" enableDebugger="true" disableClientData="false" />
...
</sites>
After that you can have code like this work: Sitecore.Context.Site.Name
Enjoy!
Monday, April 21, 2008
Adding Custom Scheduled Agents
After you get yourself familiar with the logic of Sitecore Scheduler, you may be interested in creating your own custom scheduled agent.
There are two ways of doing that. The most elegant way is to create a "task" and a "schedule" item under the "/sitecore/system/Tasks" in the master database as described in this article. After you create a command referencing a class that you develop and a schedule item to set the timing parameters, the out-of-the-box DatabaseAgent will pick it up on the scheduled basis according to its interval parameter (remember the loop nature of things). By default, there are two DatabaseAgents defined in the system. One is for the "master" database, another for "core". This should be kept in mind since in the staged environments when the content delivery server does not have access to neither core nor master database, you may need to adjust it and change the "database" parameter to "web" as your schedule item definitions should be published anyway.
There is another way to approach the creation of the custom scheduled agents and you may already guessed it. You can simply develop an agent class (see below), compile it and provide the definition of your custom agent to the Sitecore Scheduler by defining it in the web.config:
1: <scheduling>
2: <frequency>00:00:10</frequency>
3: <!-- default agents go here... -->
4: <agent type="MyProj.MyAgent, MyDLL" method="Run" interval="00:10:00">
5: <param desc="myparam">valueofmyparam</param>
6: </agent>
7: </scheduling>
The reference in the "type" attribute should correspond the existing class within existing assembly in the "bin" directory as usual.
The skeleton of any custom agent is shown below. You can dynamically pass different string parameters to your agent:
1: public class MyAgent
2: {
3: // one string parameter that can be passed from the web.config definition
4: private string myparam;
5:
6: // Constructor
7: // Notice that it expects the parameter from the agent definition
8: public MyAgent(string myparam)
9: {
10: this.myparam = myparam;
11: }
12:
13: // A method that is dynamically executed by Sitecore Scheduler
14: public void Run()
15: {
16: // do your processing here
17: }
18: }
Enjoy responsibly.
Sitecore Scheduling Explained
Sitecore provides a framework for the process scheduling out of the box. This functionality is often used in the scenarios when it is important to automate a background process of any sort such as content sync or import, cleanup, etc. So it is critical to understand the underlying logic of this process which is really straightforward, but may be unknown for the newbies.
The Sitecore Scheduler is basically a background process that is started with the sleep interval defined in the <frequency> section.
The skeleton of the <scheduling> section looks like this:
1: <scheduling>
2: <frequency>00:10:00</frequency>
3: <agent ...>
4: </agent>
5: </scheduling>
Within the execution of the Scheduler, it queries the inner contents for the agents defined there and adds to the queue only those agents which marked as "due". An agent is considered "due" if the value of the "interval" parameter is less than the timeframe of the last execution. In other words, if the agent was run 4 minutes ago last time (the frequency is set to 1 minute for example) and the interval parameter of the agent is 5 minutes, it is obvious that it will not run this time. So you may find it convenient to think about the global frequency parameters as an external loop.
An agent is considered disabled if the "interval" parameter is set to zero seconds ("00:00:00").
After the logic is able to retrieve a list of agents marked as "due", each agent is executed as a job process and the last run date is updated.
Here are some examples of what is expected in two different configurations below:
1. The case when "MyAgent" will not be executed each 10 seconds due to the bigger value in the "frequency" parameter. The agent will still be executed each 10 minutes. This is a common configuration issue for the Staging module.
1: <scheduling>
2: <frequency>00:10:00</frequency>
3: <agent type="MyProj.MyAgent, MyDLL" method="Run" interval="00:00:10"/>
4: </scheduling>
2. In this case the MyAgent code will be executed roughly each 10 minutes as specified in "interval" but will be triggered for the "IsDue" check each 10 seconds:
1: <scheduling>
2: <frequency>00:00:10</frequency>
3: <agent type="MyProj.MyAgent, MyDLL" method="Run" interval="00:10:00"/>
4: </scheduling>
Hope this makes sense.
Wednesday, March 26, 2008
Enhanced Lookup Field (continued)
This is an enhancement or continuation of my old post where I was showing how easily you can teach the lookup field to show field values of the source items instead of just name.
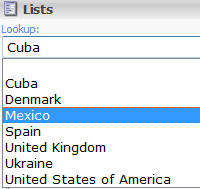
This may be pretty handy in the scenarios with more than one content languages in Sitecore. Let's imagine that we would like to have a lookup field that is used as a "country selector" pulling out those items from the "global" repository:
Then let's imagine that we have 2 more content languages besides English in the system (Spanish and Ukrainian) and that our "Country" template that our source items are created from has only one field defined that is not shared across languages and versions called "Title": 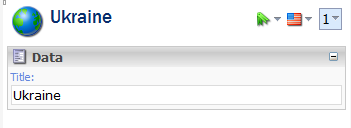
This value is going to be translated into all the languages: 
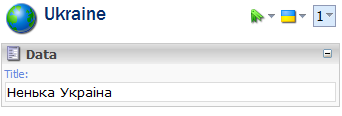
In other words, the "Title" field will have different values depending on the selected language.
Now it should make a lot of sense to "teach" our lookup field to retrieve those language specific values and show them in the drop down list instead of item names.
In order to do that, we will have to customize the lookup field by inheriting from the default one. The code of the custom lookup field is shown below:
1: using System;
2: using System.Collections;
3: using System.Web.UI;
4:
5: using Sitecore;
6: using Sitecore.Data.Items;
7: using Sitecore.Diagnostics;
8: using Sitecore.Globalization;
9: using Sitecore.Resources;
10: using Sitecore.Shell.Applications.ContentEditor;
11: using Sitecore.Text;
12:
13: namespace SCUSAINC.Shell.Applications.ContentEditor
14: {
15: public class CustomLookup : LookupEx
16: {
17: // the name of the field that we have defined for the "Template field" template
18: private const string sourceFieldName = "SourceFieldName";
19: protected string itemlanguage;
20:
21: protected override void OnLoad(EventArgs args)
22: {
23: if (!Sitecore.Context.ClientPage.IsEvent)
24: {
25: Item contextItem = Sitecore.Context.ContentDatabase.Items[this.ItemID];
26:
27: foreach (TemplateFieldItem tfItem in contextItem.Template.OwnFields)
28: {
29: // do the necessary checks
30: if (tfItem.Source == this.Source &&
31: tfItem.InnerItem != null &&
32: tfItem.InnerItem.Fields[sourceFieldName] != null &&
33: tfItem.InnerItem.Fields[sourceFieldName].Value != string.Empty)
34: {
35: // setting the FieldName property that will store the field name of the data source item
36: // that we will consume in the "GetItemHeader" method
37: FieldName = tfItem.InnerItem.Fields[sourceFieldName].Value;
38: break;
39: }
40: }
41: }
42: base.OnLoad(args);
43: }
44:
45: protected override string GetItemHeader(Item item)
46: {
47: Assert.ArgumentNotNull(item, "item");
48: if (this.FieldName.StartsWith("@"))
49: {
50: return item[this.FieldName.Substring(1)];
51: }
52: if (this.FieldName.Length > 0)
53: {
54: if (ItemLanguage != null)
55: {
56: // return the language specific value of the source item's field
57: return Sitecore.Context.ContentDatabase.GetItem(item.ID, Language.Parse(ItemLanguage))[this.FieldName];
58: }
59: }
60: return item.DisplayName;
61: }
62:
63: // this method is used to retrieve the currently selected content language
64: // note that there is no code that sets this value, it is being set from outside by Content Editor
65: public string ItemLanguage
66: {
67: set { this.itemlanguage = value; }
68: get { return this.itemlanguage; }
69: }
70: }
71: }
This should be compiled and the binary should be copied over to the bin directory. Then you should do two configuration steps and create the field reference in Sitecore:
1. Define the namespace of the control in the <controlSources> section:
<source mode="on" namespace="SCUSAINC.Shell.Applications.ContentEditor" assembly="CustomFields" prefix="custom" />
- the "namespace" attribute is equaled to the one defined in your class.
- the "assembly" attribute is obviously the name of the DLL that you compile.
- the "prefix" is something that you define but it will be used in the "field type" item creation step #3 below.
2. Open up "/App_Config/FieldTypes.config" and add the reference to your custom field:
<fieldType name="custom lookup" type="Sitecore.Data.Fields.LookupField,Sitecore.Kernel" />
- the "name" attribute will be the same as the "field type" item name in the last step below.
- the "type" attribute should be the same as above.
3. Create an "field type" item under "/sitecore/system/Field types". The easiest way to do that is to duplicate the existing "lookup" item and change the "Control" field.
Note that you should name the item as the value of the "name" attribute set on the second step.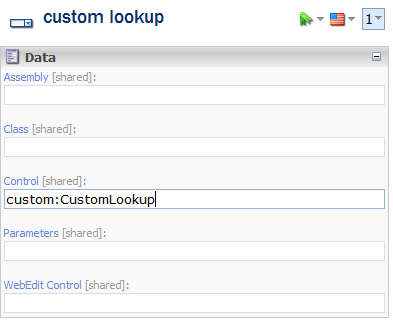
This field will contain the value of the prefix attribute set on the first step and the name of the class that you have previously compiled followed by the colon.
Well, enough boring stuff. Here is the result in Spanish:

and in Ukrainian:
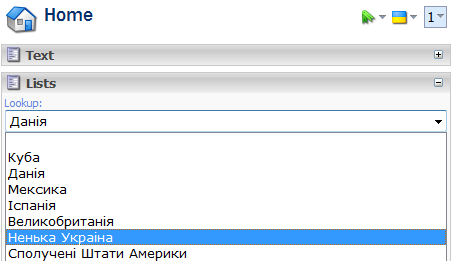
Hope you find it useful.
Subscribe to:
Posts (Atom)