Showing posts with label security. Show all posts

Wednesday, October 27, 2010

Securing Sitecore Admin


Greetings,

One of the frequent questions I am hearing besides development related stuff is configuration related. In Sitecore world, there is always plenty of options available for you in terms of configuring your production environment. Not to get carried away, but this is really a critical aspect, especial for large enterprises. When your product cannot be flexible enough to be decoupled in components, this may represent quite a challenge. Systems forcing large footprint are more difficult to maintain, backup, secure, etc.
With Sitecore, you can pretty much create a lightweight Content Delivery instance by cutting down the configuration and files to mere 50 Mb quite with a little bit of effort. This will create a more manageable and secure environment, but what if you don’t want to go through this exercise?

A quick and proven way to handle this it rely on native IIS securing features. With IIS7 you can do that even easier. What you can do is simply deny access to /sitecore folder based on IP restrictions.

1. Make sure you have “IP Security” feature installed for IIS:

image

2. Locate your site in IIS, select /sitecore folder:

image

3. On the Features view, select “IP Address and Domain Restrictions”:

image

4. Configure any allow/deny rules you want:

image

Isn’t it easy?

Friday, February 05, 2010

Sitecore 6 quick tip. Email as user name for authentication


It is pretty common to have email served as username for authentication in web systems for both visitors and internal users. Sitecore Content Management System is no exception.

With 5.3 it was pretty easy since users were just items – adjust the regex of the “ItemNameValidation” setting, make sure you don’t have @ and dots in the “InvalidItemNameChars” setting and you are pretty much set.

Now as you know, Sitecore 6 has different rules for security so you will need to do the following to make it work:
1. Make sure the membership provider treats email as a unique attribute for users so you don’t end up with more than one user attached to the same email:
<add name="sql" type="System.Web.Security.SqlMembershipProvider" connectionStringName="core" applicationName="sitecore" minRequiredPasswordLength="1" minRequiredNonalphanumericCharacters="0" requiresQuestionAndAnswer="false" requiresUniqueEmail="true" maxInvalidPasswordAttempts="256" />

2. Put email into both username and email properties (fields) of a user during the registration (can be handled via code).

3. Introduce the following entry into the web.config’s <settings> section. The “value” attribute parameter contains the regular expression used in the Create User dialog within User Manager. This regex should allow emails, otherwise Sitecore will fallback on a default regex that does not allow it.
<setting name="AccountNameValidation" value=".+" />

4. If you want to handle the case when email needs to be changed, either provide an extranet form for the profile section on your website or you can even take it one step forward – modify the EditUser dialog within User Manager to have this ability.

Happy coding!

Friday, May 18, 2007

Adding User Activation Step


You may have a requirement to have user activation in your solution.

The easiest way to do this is to extend the User template in the Security Tempalates.xml file by adding an additional field that will serve as an activation flag defining if the user can be logged in. After that you will add additional step to the login process pipeline and abort it if the user is not activated.

So here are the steps:

1. Add an additional field named “Active” for the User template as you have already did for the profiles:

<field id="{E20FD18B-6F85-4A71-A086-BEE3C0546211}" name="Active" icon="" shared="1" sortorder="" source="" style="" type="checkbox" unversioned="1"/>

After that you should be able to see the Active checkbox in the User Properties window.

2. Compile the following code and place to the bin folder:

using Sitecore.Pipelines.Login;

namespace WiseBusiness.Pipelines.Login { public class IsActive { public void Process(LoginArgs args) { // we do not want to check security for the anonymous user // also we exclude admins from this process if (Sitecore.Context.IsLoggedIn && !(Sitecore.Context.IsAdministrator) &amp;& !(Sitecore.Context.User.InnerItem["Active"] == "1")) { args.Success = false; args.Warning = String.Format("Your login was not successful, the user {0} is not activated.", args.Username); args.Abort(); } } } }

3. Add this processor definition to the web.config below the Sitecore.Pipelines.Login.Login processor:

<login argsType="Sitecore.Pipelines.Login.LoginArgs">

... <processor mode="on" type="Sitecore.Pipelines.Login.Login, Sitecore.Kernel" /> <processor mode="on" type="WiseBusiness.Pipelines.Login.IsActive, webapp" /> ...

</login>

Notes:

1. Developed for 5.3.1 (rev. 070417)

2. Was not thoroughly tested, so provided "as is".

Thursday, April 12, 2007

Security Wise User Manager


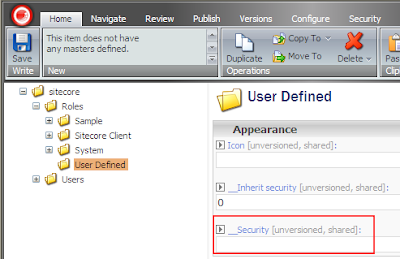
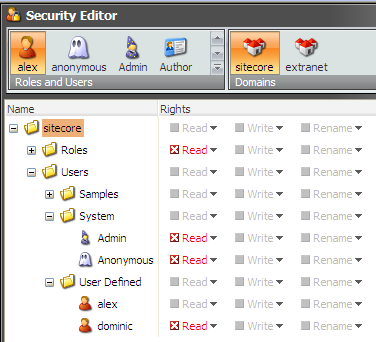
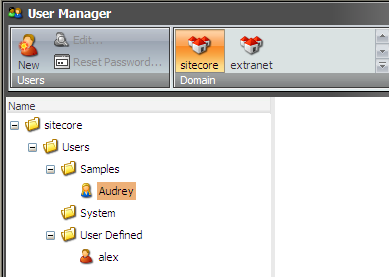
This applies to Sitecore 5.3. The problem. As you may know, by default it is not possible to restrict access to certain security items in the security or extranet databases. You can check it by going to the security or extranet database and trying to set permissions in the Security Editor, the application just won't let you deny access to a specific item. The reason is that these items do not have the necessary system field named "__Security" that stores the security assignments. The background. There could be a requirement for certain users to see only a subset of users and roles. For example, Biology department should not manage users from another departments. The solution. So the first step to make it happen is to modify the security templates to include the field which will be storing the security definitions. This file is stored under "/sitecore/shell/" and it is called "security templates.xml" and the purpose of this file is to define the data structure of the security templates which are created on the fly using these XML definitions. The following field definition should be added to the Folder, Role and User templates. The section you are adding to is not important but it is preferred to add the fields to the Data section (create it if it is not there yet). <field id="{DEC8D2D5-E3CF-48B6-A653-8E69E2716641}" name="__Security" icon="" shared="1" sortorder="" source="" style="" type="text" unversioned="1" /> The attributes in bold are important. The id attribute should be set to the "__Security" field ID and the name is important as well. After this change, IIS restart and browser reopen is required. You should see the following picture in the Content Editor when browsing the security and extranet databases: This means that now you can deny read access in the security or extranet databases: It is not all that you should do though, because the User Manager won't just respect this security settings. So the second step is to override this application. It is fairly simple: 1. Copy the XML control source file named Security manager.xml from "\sitecore\shell\Applications\Security\Security manager\" to "\sitecore\shell\override". 2. Don't forget about this when upgrading :-) 3. Compile the following code for this form and place the assembly to the bin folder. Here is the source: using System; using System.Data; using System.Configuration; using System.Web; using System.Web.Security; using System.Web.UI; using System.Web.UI.WebControls; using System.Web.UI.HtmlControls; using System.Collections; using Sitecore; using Sitecore.Data; using Sitecore.Data.Items; using Sitecore.SecurityModel; using Sitecore.Configuration; using Sitecore.Web.UI.HtmlControls; namespace WiseBusiness.Shell.Security { public class CustomSecurityManagerForm : Sitecore.Shell.Applications.Security.SecurityManager.SecurityManagerForm { private ArrayList deniedItems = new ArrayList(); protected override void OnLoad(EventArgs e) { base.OnLoad(e); if (!Sitecore.Context.ClientPage.IsEvent) { // we should respect administrators if (!Sitecore.Context.User.IsAdministrator) { // fill the array list of item the current user does not have access to GetDeniedItems(); string deniedItemIDs = ArrayListToString(deniedItems, ","); if (deniedItemIDs != string.Empty) { // setting the data context excluding items that the current item does not have access to this.FilteredDataContext.Filter = "not(Contains('" + deniedItemIDs + "', @@id))"; this.DataContext.Filter = "not(Contains('" + deniedItemIDs + "', @@id))"; } } } } private string ArrayListToString(System.Collections.ArrayList ar, string delim) { return string.Join(delim, (string[])ar.ToArray(typeof(string))); } private void GetDeniedItems() { // getting the selected domain Database database = Factory.GetDomain(this.Domain).Database; if (database != null) { // checking security recursively ProcessItem(database.GetRootItem()); } } private void ProcessItem(Item parent) { foreach (Item child in parent.Children) { using (new SecurityDisabler()) { // check if the context user cannot read the current item if (child.SecurityField.GetRights(Sitecore.Context.User, true) == ItemRights.DenyRead) { deniedItems.Add(child.ID.ToString()); } } ProcessItem(child); } } } } The comments in the code should help to understand the concept. If not, shoot me a message. The key things: - Inheriting from the existing User Manager form. - Calling the base OnLoad method thanks to the power of inheritance. - Modifying the FilteredDataContext's and DataContext's filters to exclude security items that the current user does not have access to. 4. Make the following change in the XML control source file to reference the newly compiled class (as usual): <CodeBeside type="WiseBusiness.Shell.Security.CustomSecurityManagerForm,WiseBusiness" /> Here is the resulting picture in the User Manager for the user: As can be seen, this user cannot see the roles container, system users and user named dominic. Of course, the code might be far from perfect but I am open to suggestions! Update: this will be addressed in next major release.
Tuesday, January 02, 2007

Cannot see the template folder?


This is applied to Sitecore 5.3 061102. If you create a folder (template container) for your custom templates in the Template Manager, you might not see this folder in the dialog when adding an item from a template or changing the template. The solution is to edit the \sitecore\shell\Controls\Data\TemplateDataContext.xml file to include the GUID of the template "Template Folder" that is placed under /sitecore/templates/system/templates/. The Filter attribute of the DataContext definition should be edited:
before: Filter="Contains('{E3E2D58C-DF95-4230-ADC9-279924CECE84}, {...}, {...}', @@templateid)"
after: Filter="Contains('{0437FEE2-44C9-46A6-ABE9-28858D9FEE8C},{...}, {...}', @@templateid)"
where {0437FEE2-44C9-46A6-ABE9-28858D9FEE8C} is the GUID of the "Template Folder" template.

Friday, August 18, 2006

5.3: Enabling Edit chunk in Content Editor


You may not see the Edit chunk/button while being logged in as a newly created user. Complete these steps to make it visible: 1. Switch to the core database; 2. Open the Security Editor; 3. Locate this item /sitecore/system/ribbons/chunks/workflow edit/edit; 4. Toggle the inherit checkbox as shown below:

Thursday, June 29, 2006

Media Library: problem with uploading


If you experience that after uploading media items are not showing in the Media Library while physical files were copied into the upload folder, the following instructions should fix the problem. 1. Open the Access Viewer. 2. Ensure that the Inherit checkbox is set for the Masters node for the sitecore/anonymous user. 3. The sitecore/anonymous user should have all allowed security rights for the whole media library. 4. Check also that the Everyone group has the same security setup. I.e. this user (sitecore/anonymous) should have rights for the Media Library where the items are created and for the masters the media items are created from since these actions are performed under this account.

Thursday, March 23, 2006

Accessing the AD server over Windows Firewall using the LDAP module


The following steps should be done in order to let the LDAP module access the AD server when Windows Firewall is switched on. 1. Open the Windows Firewall. 2. If it is turned off, activate it. Note: Exceptions should be allowed. 3. Switch to the Exceptions tab. 4. Click the Add Port button. 5. Specify name of the exception (e.g. LDAP), port number (389) and protocol to be used (TCP). 6. Click OK. 7. The newly created exception must be activated by default. After this, the LDAP module can access the AD server and query the directory for users and roles. Related reading.